maintenance & repair
The following is a beginner friendly guide to assist you with repairing / cleaning your Nintendo Entertainment System. Before we begin, please ensure you have the following items on hand:
- #1 Magnetic Phillips Screw Driver
- 99% Isopropyl Rubbing Alcohol
- WD-40 Specialist Quick Drying Contact Cleaner or QD Electronic Cleaner
- Q-Tips / Cotton tipped swabs
- A clean NES game of little value
- Nail Brush
You don't want to do this over and over again, do you? This advice may seem obvious, but with NES it's especially important.
- Never leave the NES' lid open, especially when there's no game in it.
- Clean your games regularly and keep them in a dust cover when not in use.
- After buying a new game, don't put it in your NES until after you've thoroughly cleaned it.
- Use an Everdrive. Your NES only gets dirty because you're swapping games in and out.
Or, avoid all of this and...
Due to the age of the materials, I don't recommend using the official Nintendo cleaning kit. You can try one if you'd like, but modern day cleaning kits such as 1UP Card exist. I haven't personally used it, so I have no idea how effective it is. Use with caution.
If your NES powers on, shows some kind of picture, but doesn't boot games it's best to assume it's just dirty. Game Genie can wear these out, but I can't find any evidence that these pin connectors mechanically wear out solely because of licensed game use. Experience suggests that it doesn't. I'll show you how to test for Game Genie damage shortly.
Referred to in its patent as a low insertion force edge connector and by the NES community as a 72-pin connector, the NES' cartridge connector is primarily responsible for the NES' unreliability. For this page, I'll try to stick to cartridge connector unless I need to be extra specific.
The Nintendo Entertainment System features a unique cartridge loading mechanism wherein users slide a game into the cartridge tray and mechanically press it down into place. According to the patent, Nintendo designed the cartridge port in this manner to prevent contact abraision.
Due to this design, the NES is very suceptable to filth accumulation and cartridge loading failures are exceedingly common. During it's heyday, people would blow into their cartridges, apply various unhelpful solvents, and in some cases, jam objects into the console alongside the game to "push it down further". In fact, some people still use these archaic troubleshooting methods.
When you're repairing anything, it's a good idea to understand why before you begin. These solutions may be effective at treating symptoms of the root problem, but they don't solve it. In fact, many of these "solutions" can make the problem worse.
The following is a list of things you should not do.
- Do not blow into your game. The moisture in your breath is terrible for electrical contacts.
- Do not force other objects into the console while an NES cartridge is inserted. You may damage the cartridge tray.
- Do not use sand paper on your game cartridges or your 72-pin connector. Sand Paper-- regardless of grit-- is abrasive and abrasion will lead to oxidation. You don't want that. This tutorial will teach you how to clean your 72-Pin Connector without using abrasive techniques.
- Do not use a Game Genie just because it helps you boot the game. prolonged usage of the Game Genie may permanently damage your otherwise potentially repairable 72-Pin Connector. Game Genie's card edge connector is 0.4mm thicker than that found in a licensed NES game. It may not sound like much, but it is. Read more about that below.
- Do not attempt to modify the 72-Pin Connector contacts unless you've already determined that cleaning is ineffective. Even then, it's better to simply replace the connector. If you do this repair wrong, you risk damaging the contacts on your games.
With that out of the way, let's take a look at what's actually going on here. This information stems from both personal experience repairing these machines and information gathered online that I can circumstantially verify.
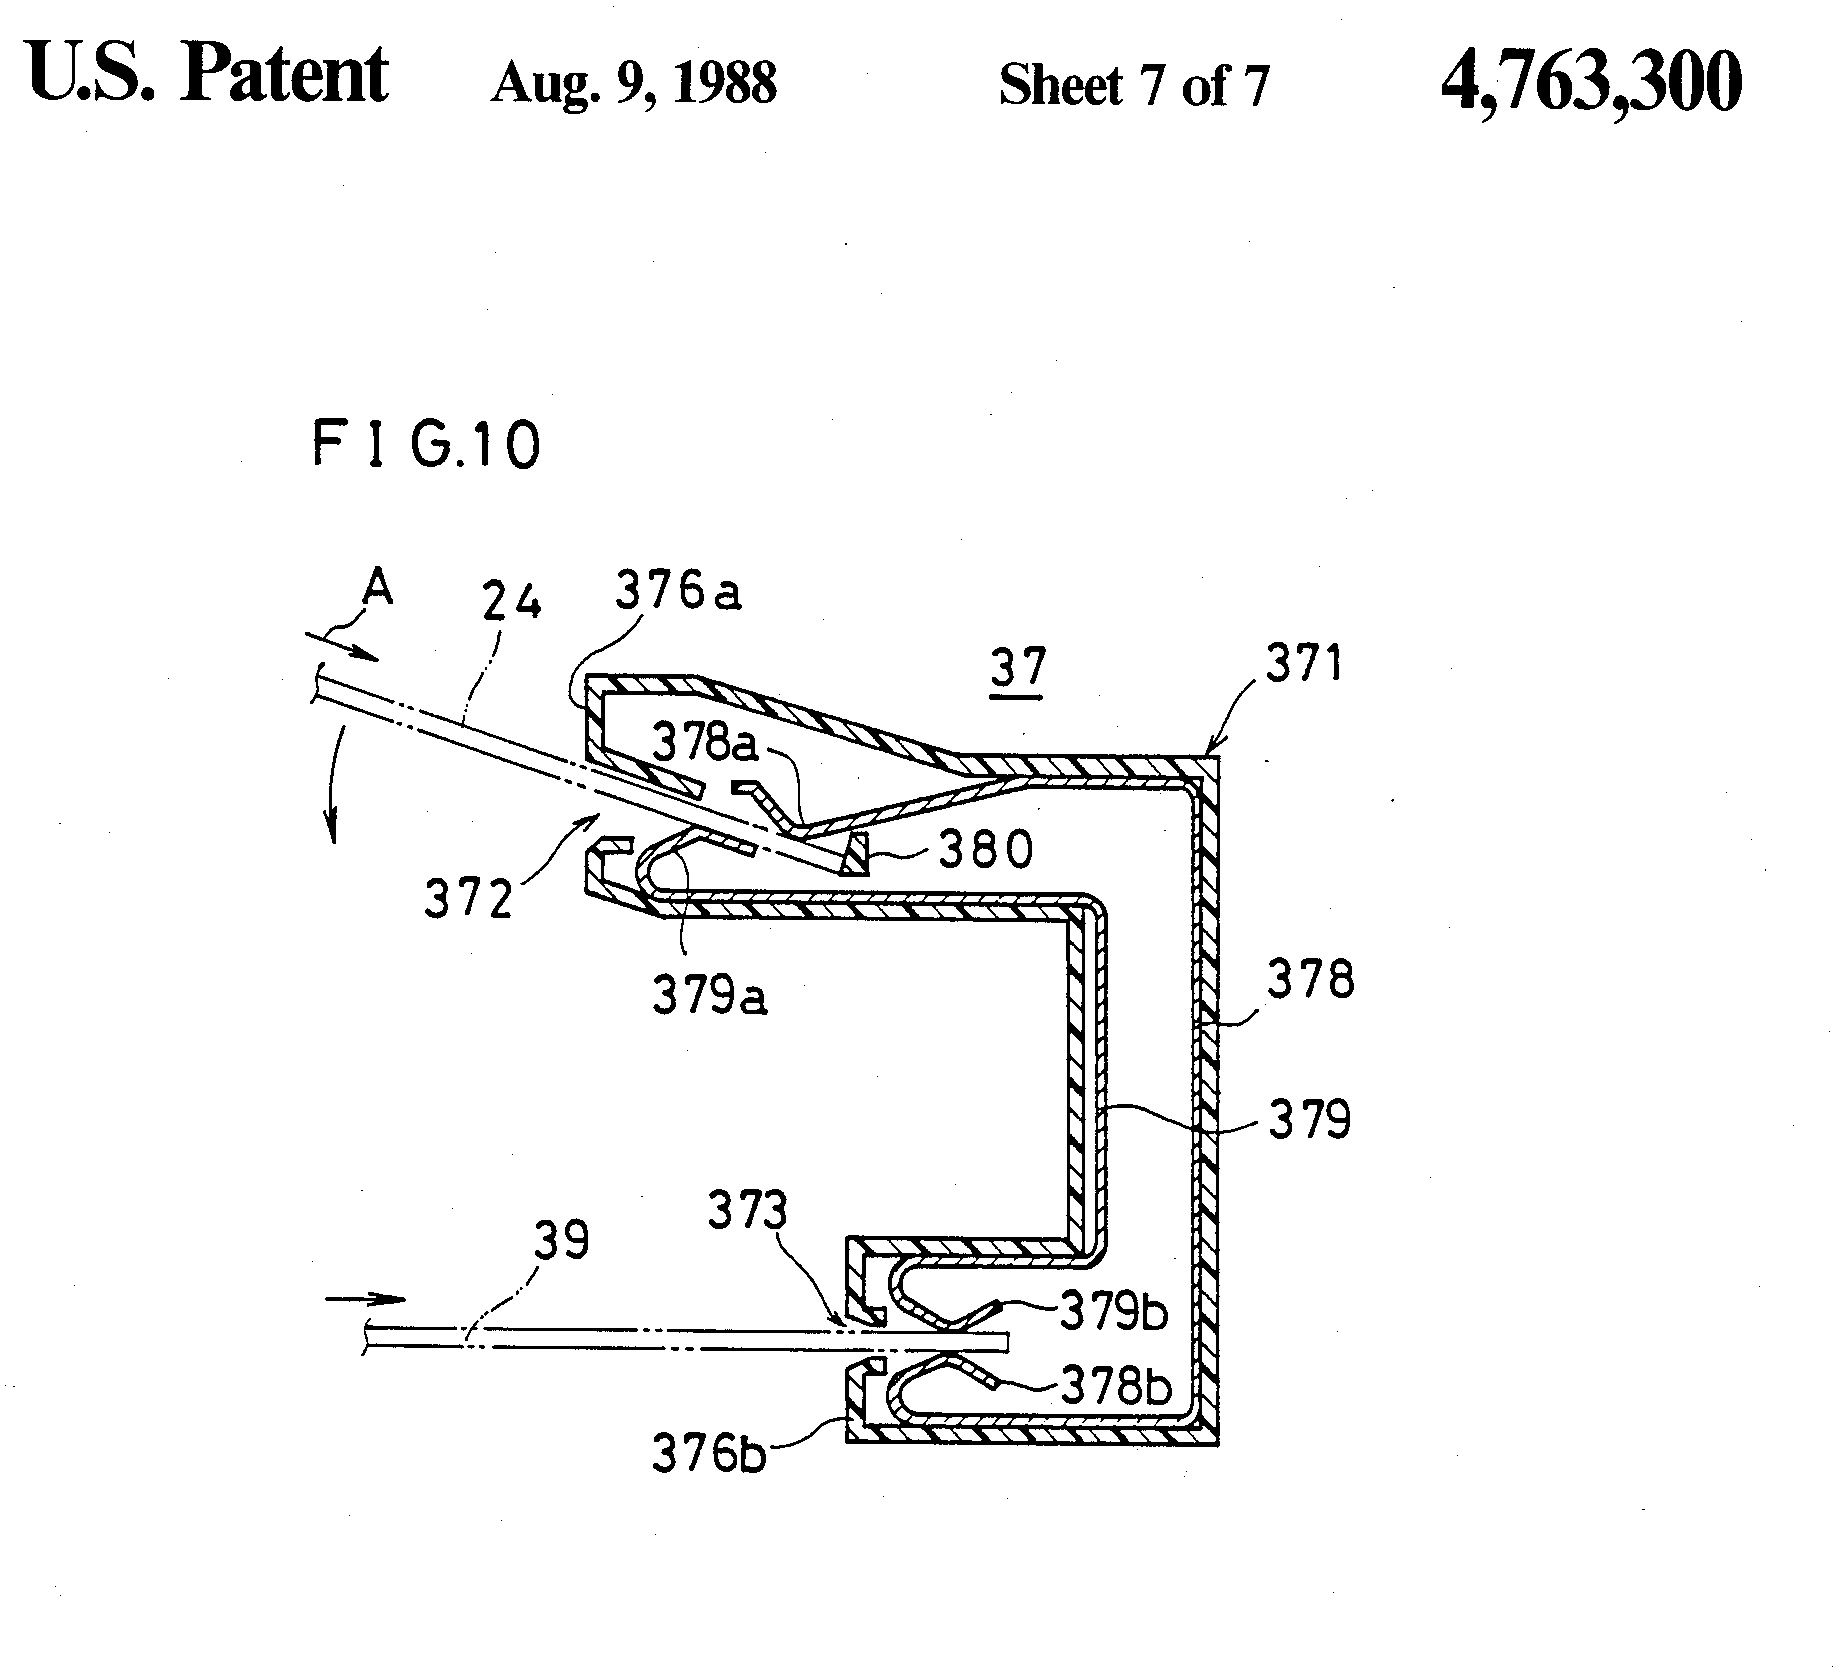
NES cartridge port patent diagram. Click to enlarge
Nintendo's "low insertion force edge connector" is the subject of a lot of well intentioned yet unsubstantiated rumors due to it's design. People believe that constant flexing of the cartridge port will cause the pins to become "bent" and thus make poor contact. This leads to a lot of questions- such as: is this caused by Nintendo's intended usage of the device and if so, how do we know that?
Until some kind of evidence emerges, the claim that regular usage reduces the NES' contact force is a hypothesis that has never been proven by anyone. People can and will claim it as fact, but without that evidence, I don't believe it. There needs to be something that outright shows cause and effect. Comparisons, experiments where someone actively kills one by repeatedly depressing a game within the tray-- that kind of thing. If someone else doesn't do it soon, I just might try it.
I've restored a large number of NES consoles that were otherwise in horrific shape just by cleaning them. When one immediately assumes "bent pins" to be the problem, they end up working much harder than they need to. Until actual evidence emerges proving this theory to be correct, don't waste time acting like it is. You should never tackle a repair with assumptions based on hearsay.
The above section should not be taken as a claim that the cartridge connector's pins cannot be deformed. Game Genie is designed in a way that can do just that. Keep in mind, Nintendo blatantly did not intend people to use the NES in this manner. The patent diagram above depicts a highly precise mechanism. Game Genie defeats that mechanism because it needs to in order to function.
An OEM 72-Pin Connector is designed to accept a 1.2mm thick circuit board and all licensed NES games fit this standard. The Game Genie's circuit board is 1.6mm. This increase in thickness is required in order for the Game Genie to make connection with your NES' Cartridge connector as it cannot be pressed down into the tray.
This increase in thickness almost certainly puts the cartridge connector under significant mechanical stress. I've observed that excessive use of Game Genie can lead to an NES becoming completely inoperable unless the Game Genie is attached to the game you're trying to play.
It's easy to determine if a used NES console has been damaged by Game Genie.
- Remove the 72-Pin Connector from the console
- Plug a game into it and hold the cartridge upright.
- Give it gentle shake
- A undamaged connector will hold onto the cartridge firmly
- A damaged connector will be far looser, and may even fall off
Click here to view a demonstration video.
If your 72-Pin Connector fails this test, it's junk and I wouldn't bother trying to repair it-- you'll cause more problems than you'll solve. Swap it out for a Nin10-Drawer and wash your hands of this nonsense.
If you're absolutely hell-bent on using a Game Genie, the device itself isn't necessary. Everdrive, PowerPak, and the RetroUSB AVS console all have Game Genie built into them. My personal recommendation is Everdrive. With .txt files, you can load codes automatically. Refer to the manual for more information.
Nintendo's patent text states the following:
"Still another object of the present invention is to provide a front loading apparatus which will minimize the abrasion of the connecting electrodes of the circuit board of the memory cartridge."
in other words: the 72-pin connector was intentionally designed in a way that significantly mitigates contact wipe. That will absolutely have a negative effect on performance. I spend a lot of time actively rallying against abrasive repair methods, but for a game console cartridge port, reasonable levels of contact wipe are to be expected in order for the console to remain functional. See: every other major cartridge based console in existence.
When you use a Front Loading NES, games will deposit naturally accumulated debris into its cartridge connector. This debris is not scraped away when the cartridge is mated with the console. Instead, it ends up contaminating the connector. Over time, this contributes to electrical resistance between your game and the cartridge connector. In order to prevent that, one must ensure that the games they play are clean.
NES games are easy to clean and dust covers are widely available. There's no need to clean your game each time you wanna play it. An occasional alcohol soaked Q-tip to the contacts is all you need. Especially if it hasn't been played recently or it's been left exposed. Don't forget your dust cover! They aren't some miracle cure and you shouldn't expect them to be perfect at protecting your games, but they are very important.
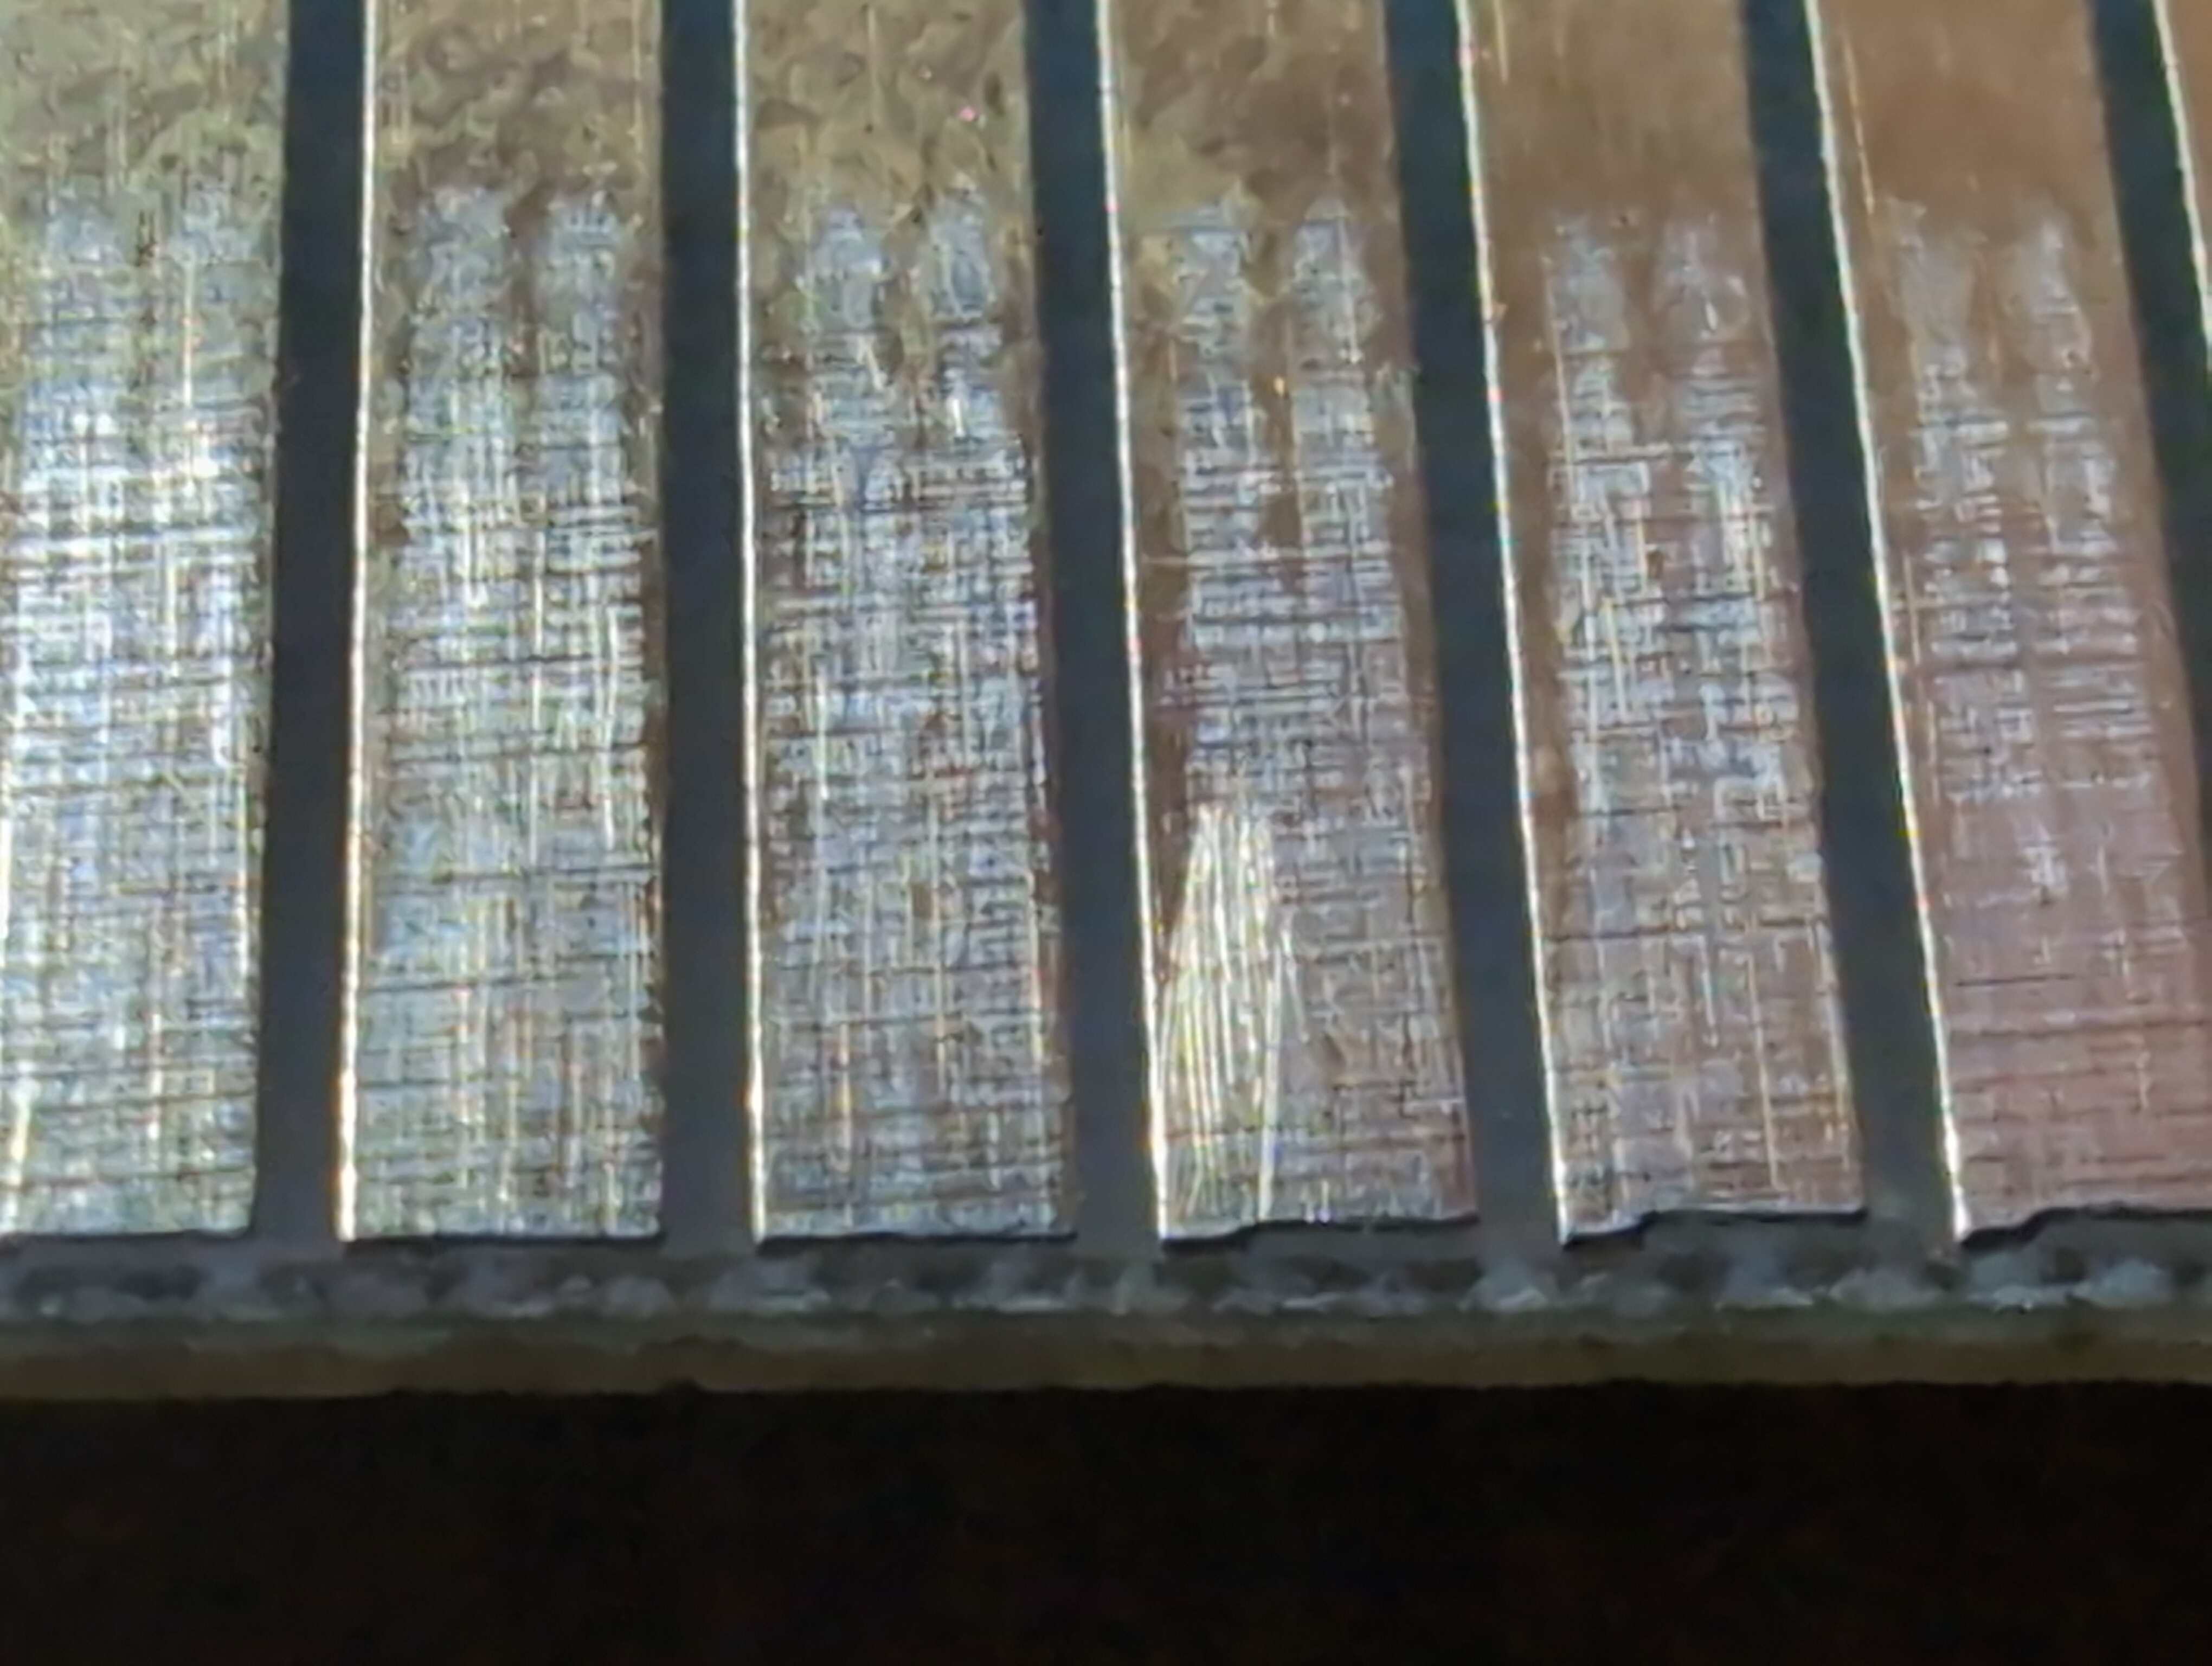
NES Game contacts after being used with a cheap aftermarket connector. Click to enlarge.
Replacing the connector seems like the simplest solution to this problem and you'd be right. In fact, were someone to create a replacement that fundamentally alters the NES' cartridge mechanism in a beneficial manner, it would be the obvious choice above anything else. Blinking Light Win did this in the past, but it sounds like that thing had excessive contact force. I don't actually know. Blinking Light Win was released over a decade ago, and I can't source one right now to evaluate it.
Luckily, Nin10-Drawer is available. I'd recommend buying and installing that over following this tutorial if you can help it. Contact force is reasonable, it doesn't feel cheap, and the mechanical aspects feel very durable. It also includes circuitry that disables the CIC. Every last licensed cart I tested in Nin10-Drawer worked perfectly. A variety of unlicensed games I tried with it also worked. The manufacturer claims Game Genie doesn't work, so I didn't bother testing it. Considering Game Genie's card edge thickness, you should take their word for it.
Some unlicensed games include CIC stun circuits. I don't know what kind of long term effect that could have on the Nin10-Drawers internal lockout defeat. Even though they work, I would recommend against using Camerica carts with Nin10-Drawer. Especially Alladin Deck Enhancer.
DO NOT use the aftermarket 72-Pin Connectors found on Amazon or eBay. I bought two different samples to determine if the rumors that they're destructive are true. Both of them scratched the crap out of the contacts on my test games. Check out this page for an in depth look.
When repairing an NES, I usually forgo disabling the lockout chip. Simply put: it's not necessary. Remember what I wrote about fixing root causes over symptoms? Well, the problems the CIC causes are a symptom of a bad cartridge connector. When your connector is fully functional, the lockout chip will almost never pop off. Keeping it functional will allow you to determine when it's time to clean your console.
In this specific case, There's no downside to disabling it and this is just a personal preference of mine.
The common method for doing so involves using flush cutters to snip pin 4 off of the IC. You're not harming anything by leaving it floating (just sitting there as is).
This guide is intended solely for those with trouble booting games. If your console isn't powering on, or you have other problems, please feel free to e-mail me and we'll see what we can do about it. I'm happy to consult with anyone in need of assistance.
Please follow these directions carefully and work in a clean, well lit environment. failure to do so can lead to extra work or damage to your console.
This is an easy repair so long as you keep a few things in mind: don't lose parts, screws, or re-install parts incorrectly. It's easy to screw up your cartridge tray and/or crush the controller port wiring with the consoles motherboard. Pay attention to what you're doing and take your time.
Failure to follow this step can result in damage to your NES. Replacing your CPU and/or other components is much tougher than pressing that button, I assure you.
Disconnect all cables from your NES and press the power button. This will discharge the residual energy inside the console and make it safer to work on. Watch the power light as you press the button. You may notice a quick flash of light. Neat, huh?
If at any point you plug the console in for testing, be sure to repeat this step before you begin working on it again.
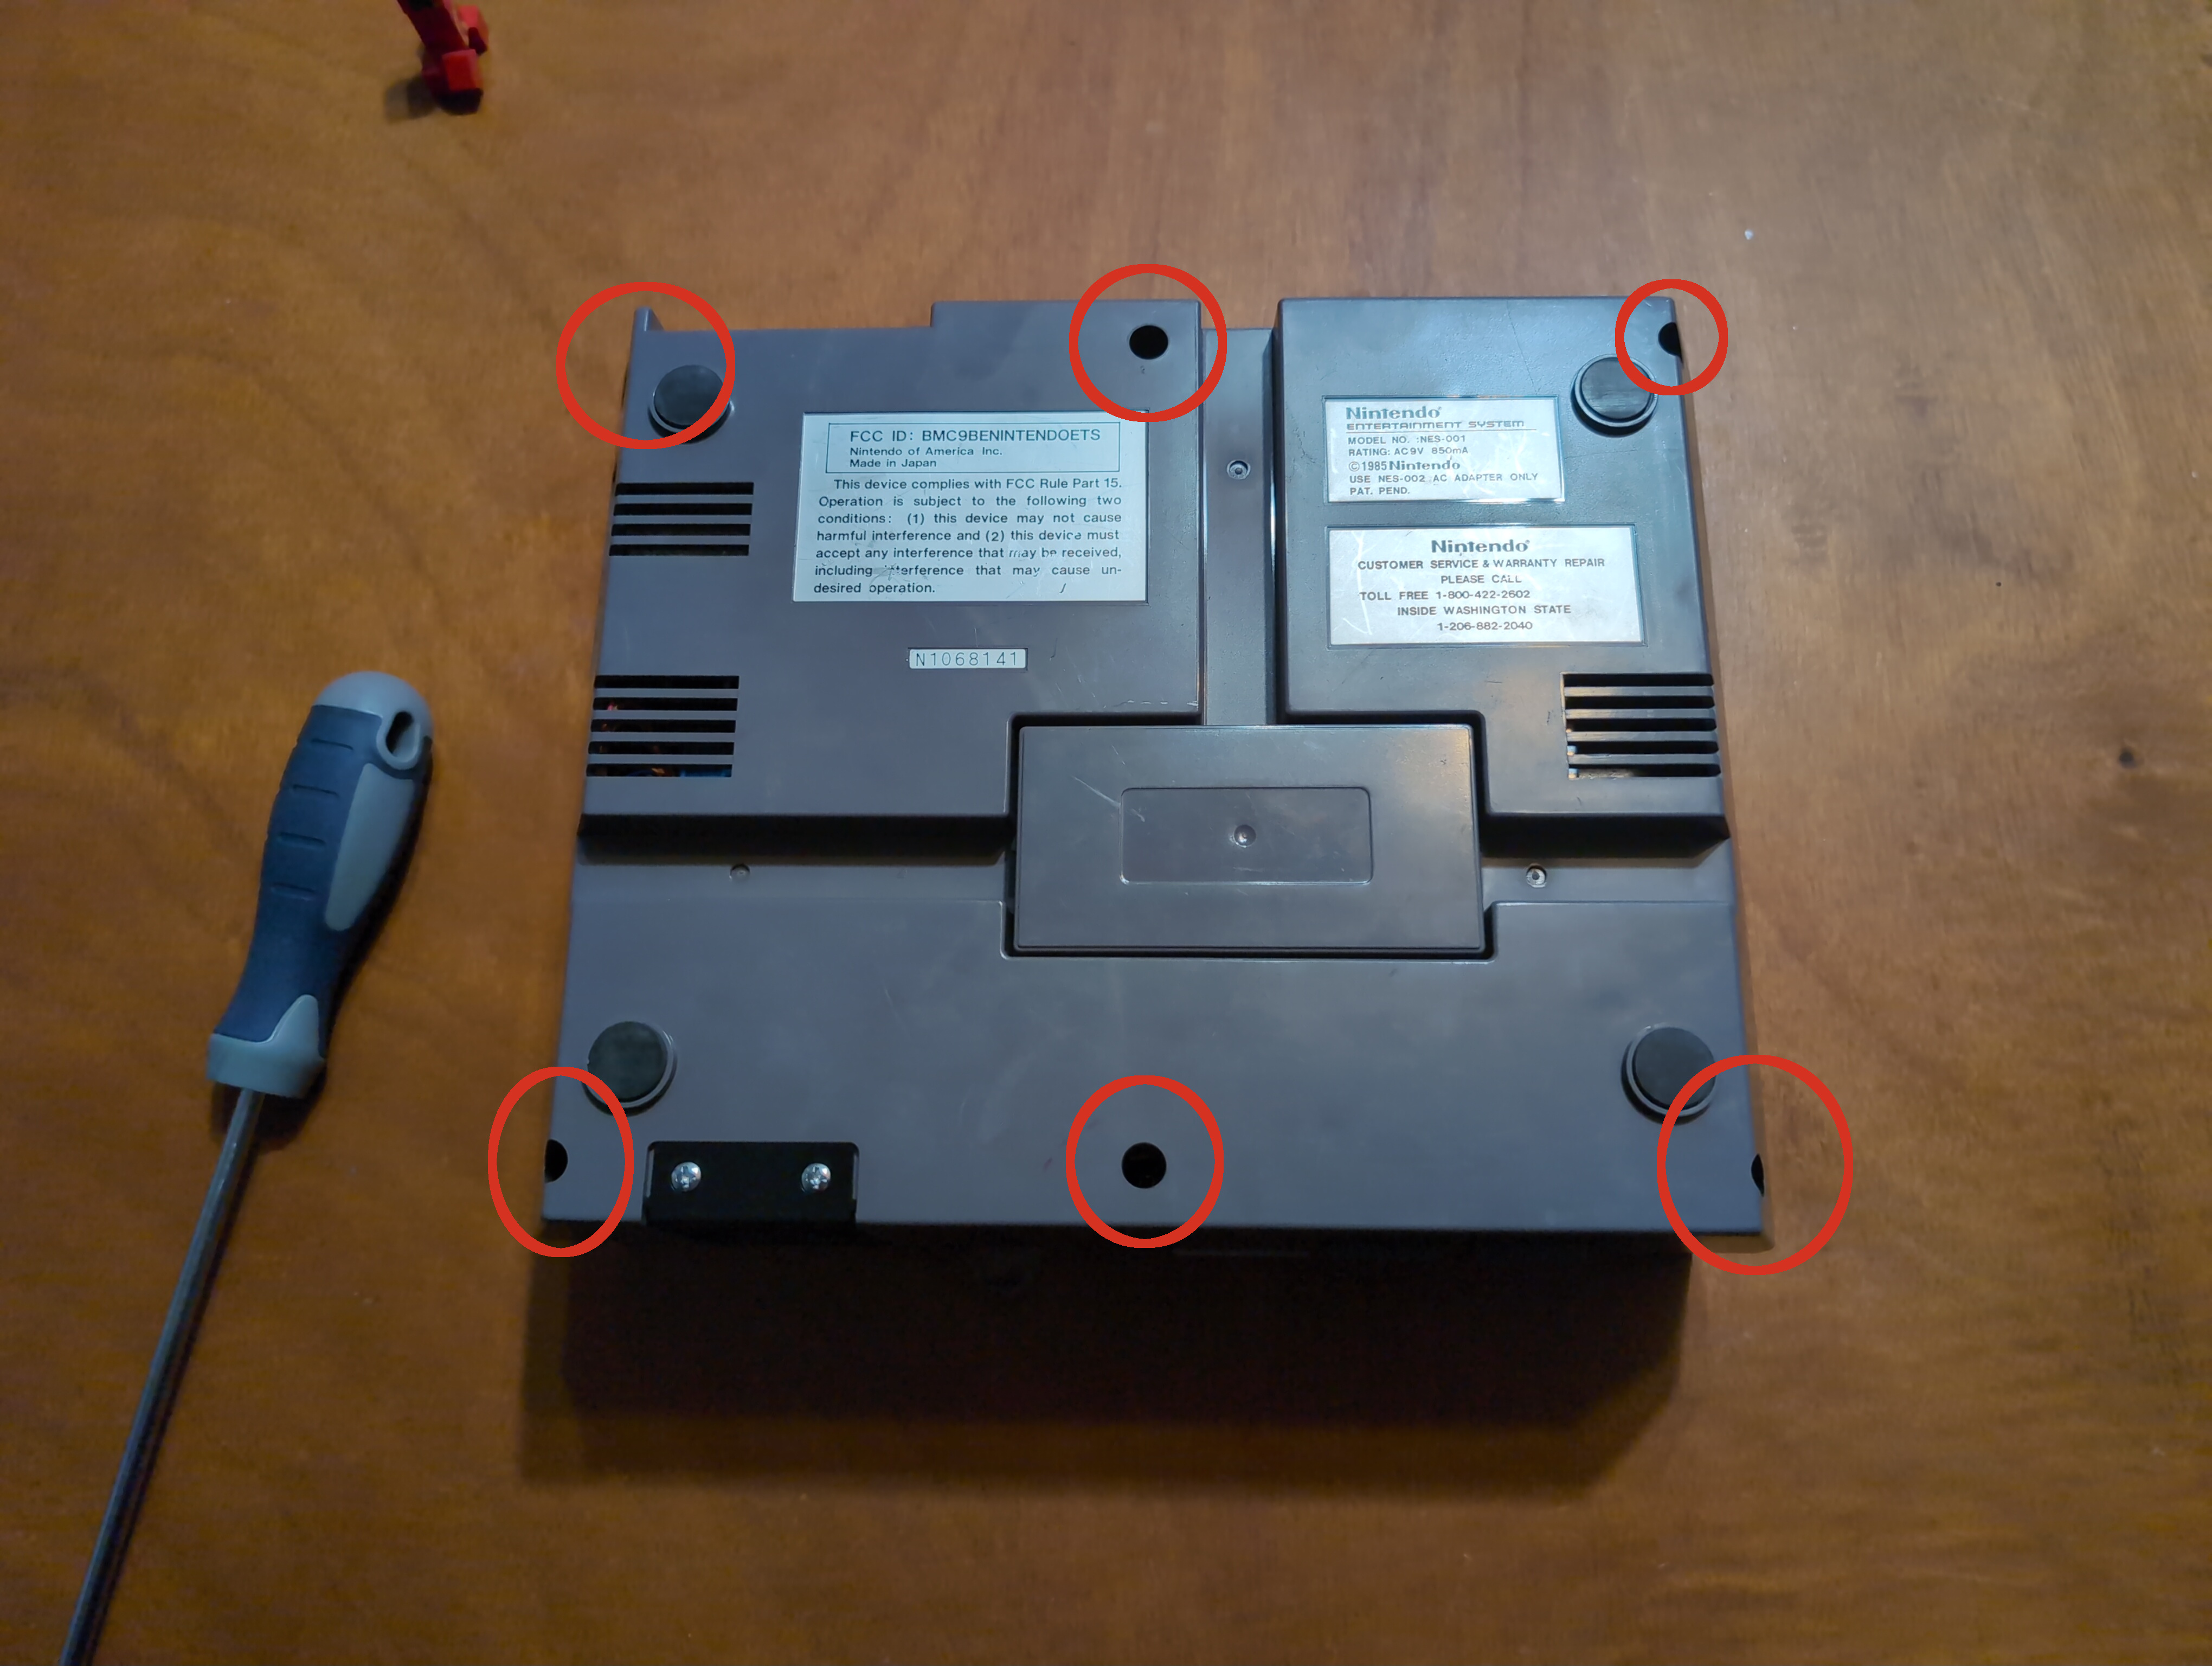
All 1/2 inch screws are threaded the same, and can be used anywhere circled in red.
A) Flip your NES over and remove the six 1/2 inch screws holding the case together
B) Remove the top and flip it upside down. Place your screws inside for safe keeping.
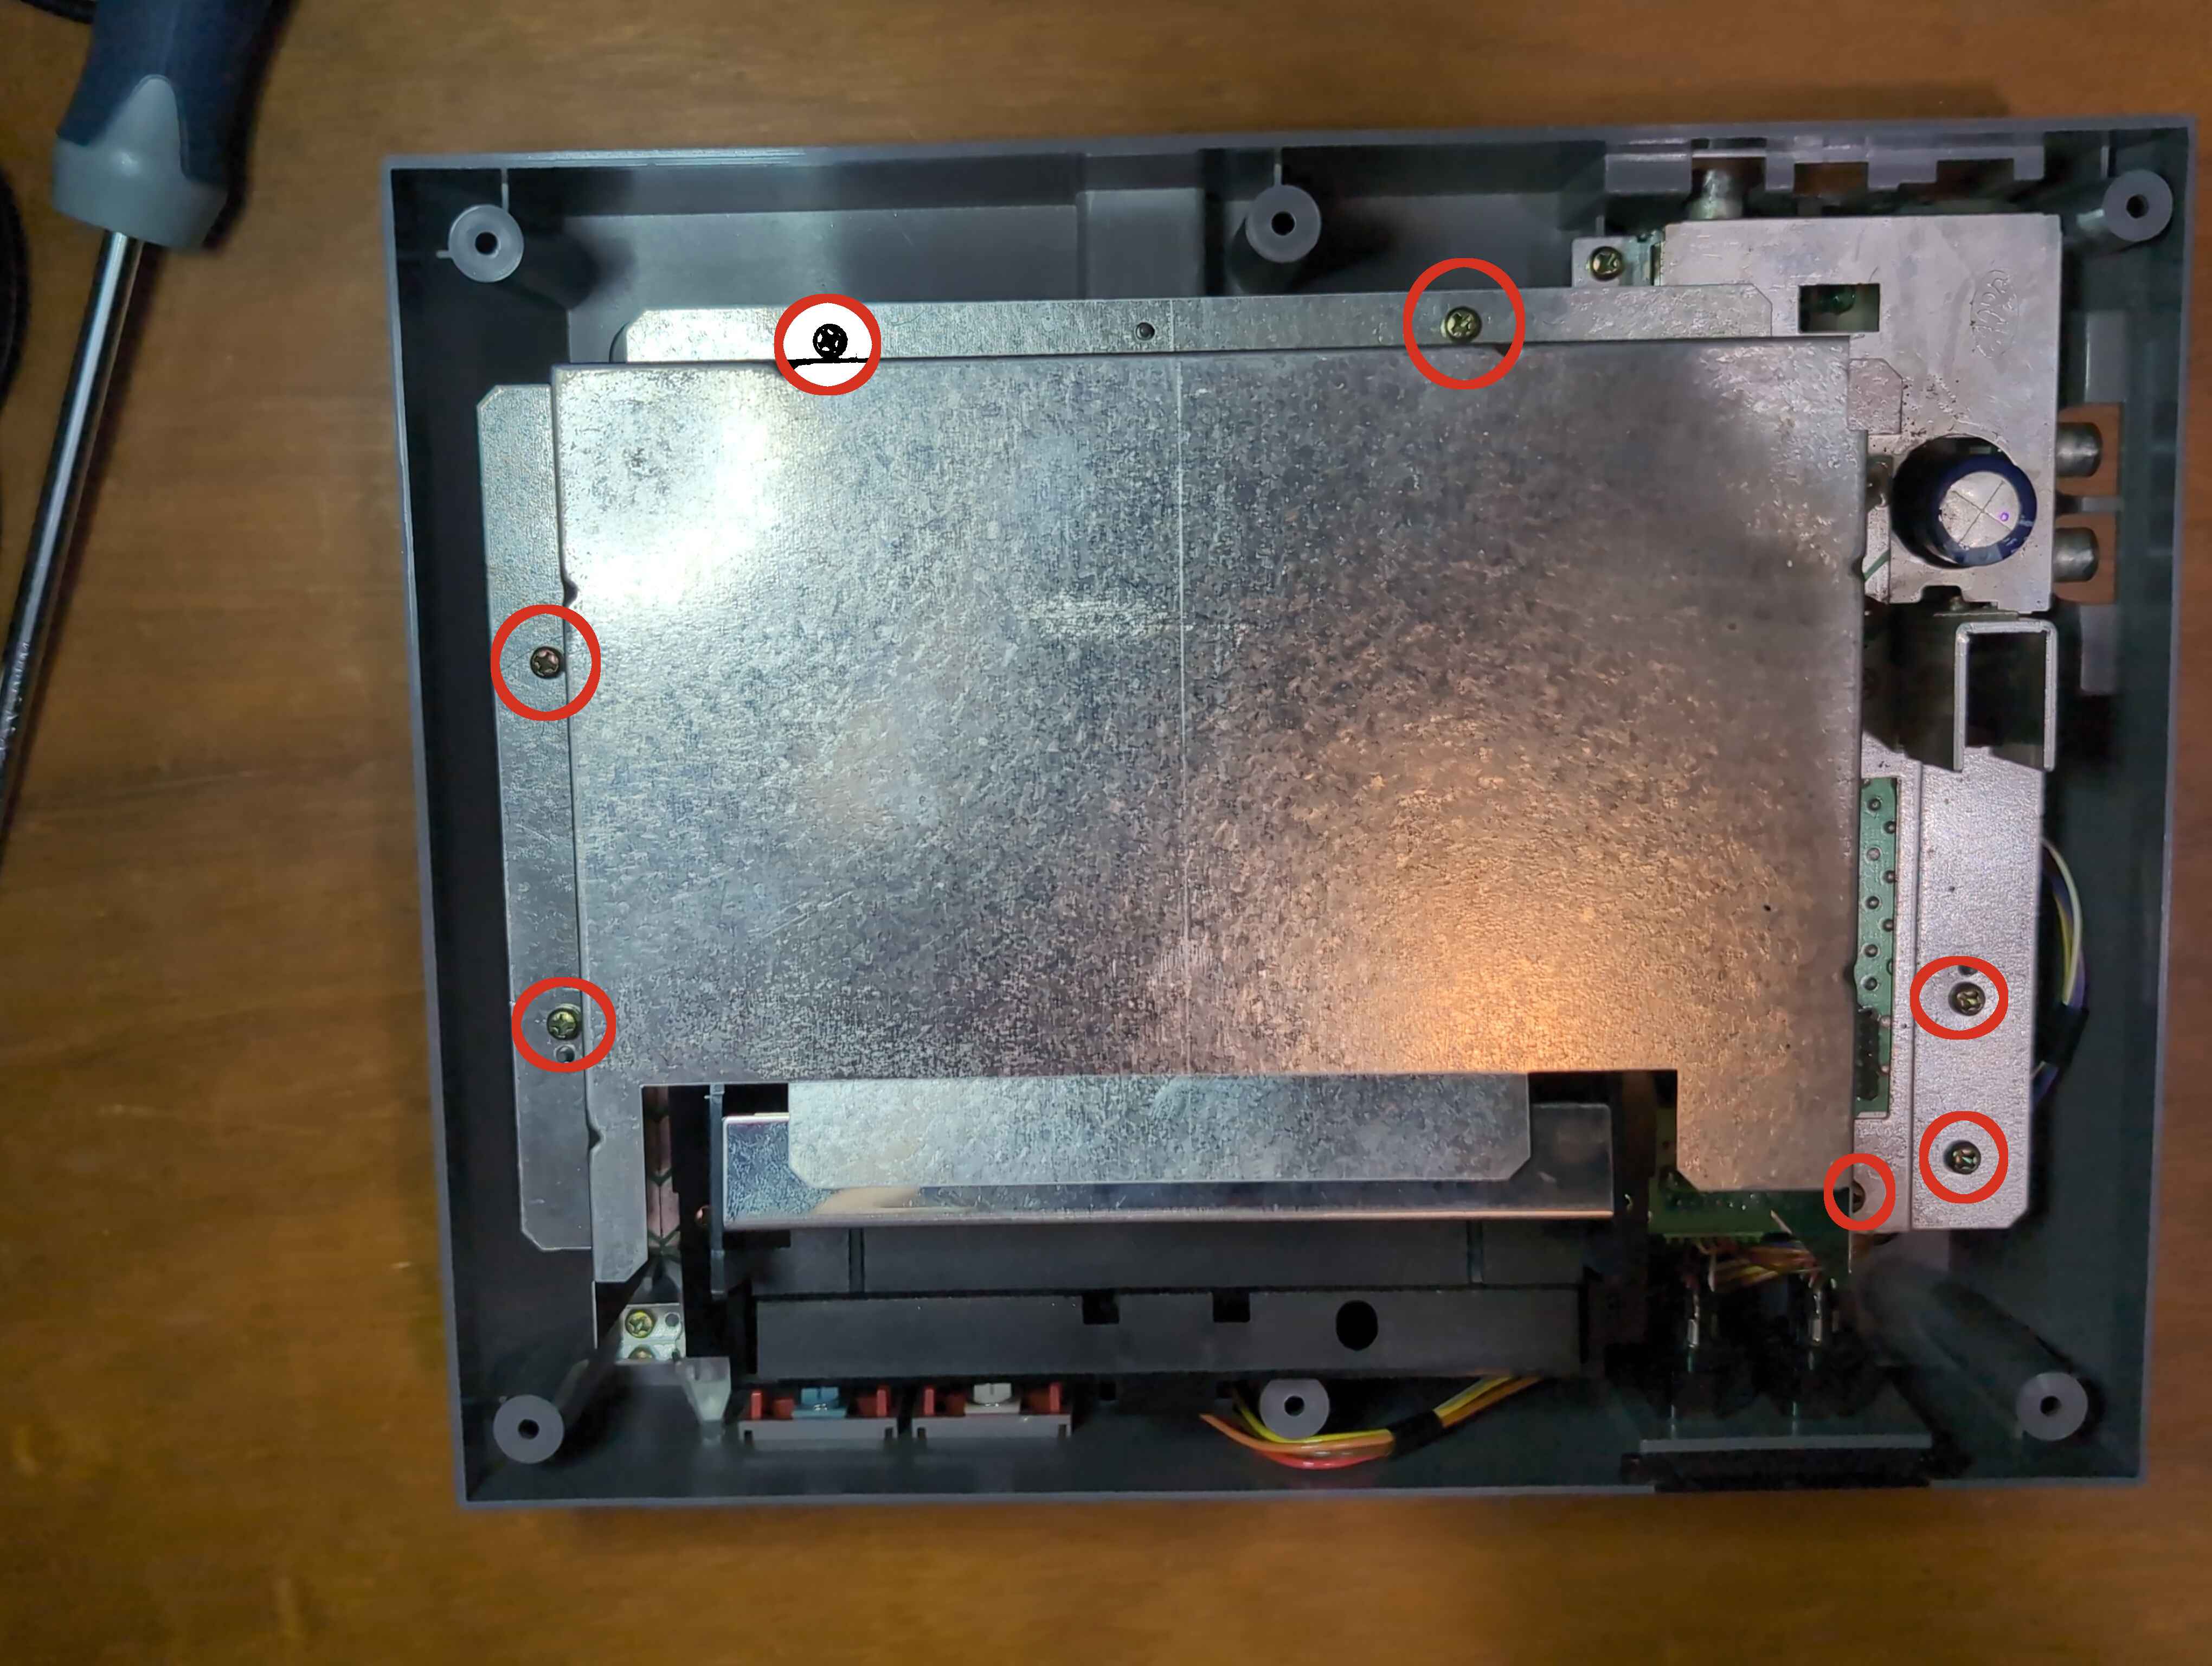
A) Remove the 1/2 inch screws as shown in the photo
B) Carefully remove the top RF shielding and put it somewhere safe. Be sure not to allow it to come in contact with any of the signal pins on the motherboard. Especially if you didn't follow step one. Of course, you did follow step one, right?
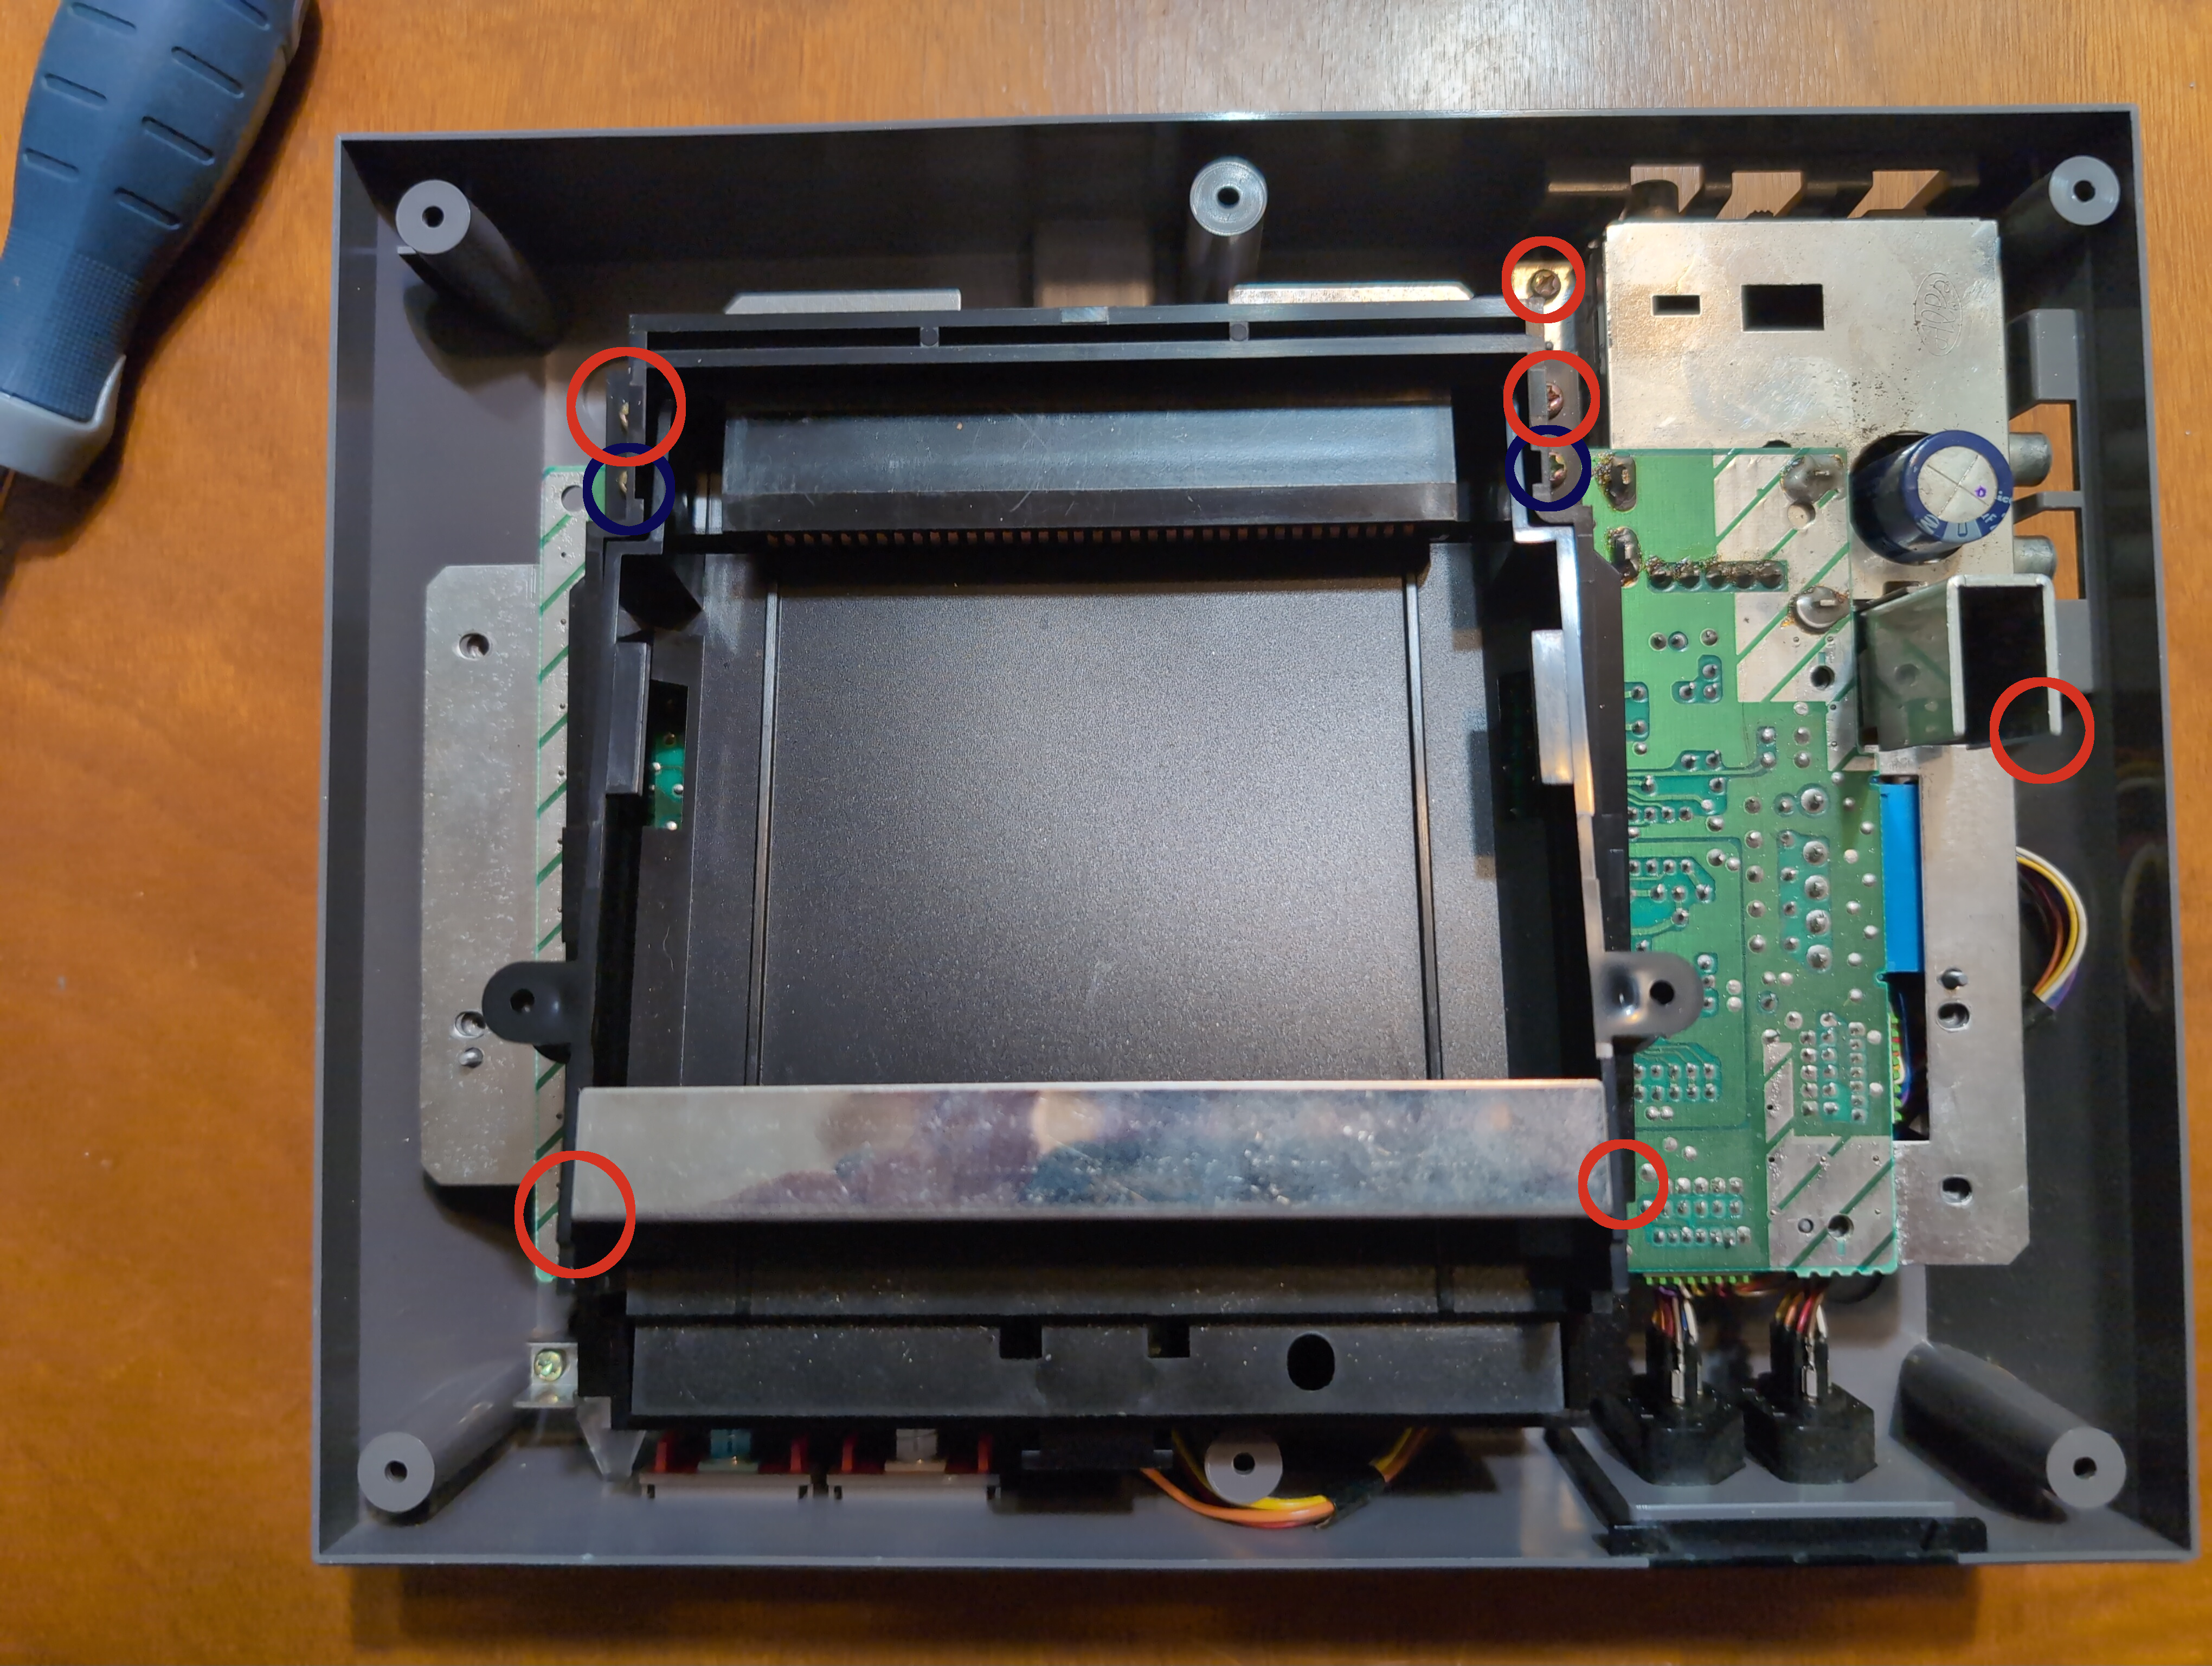
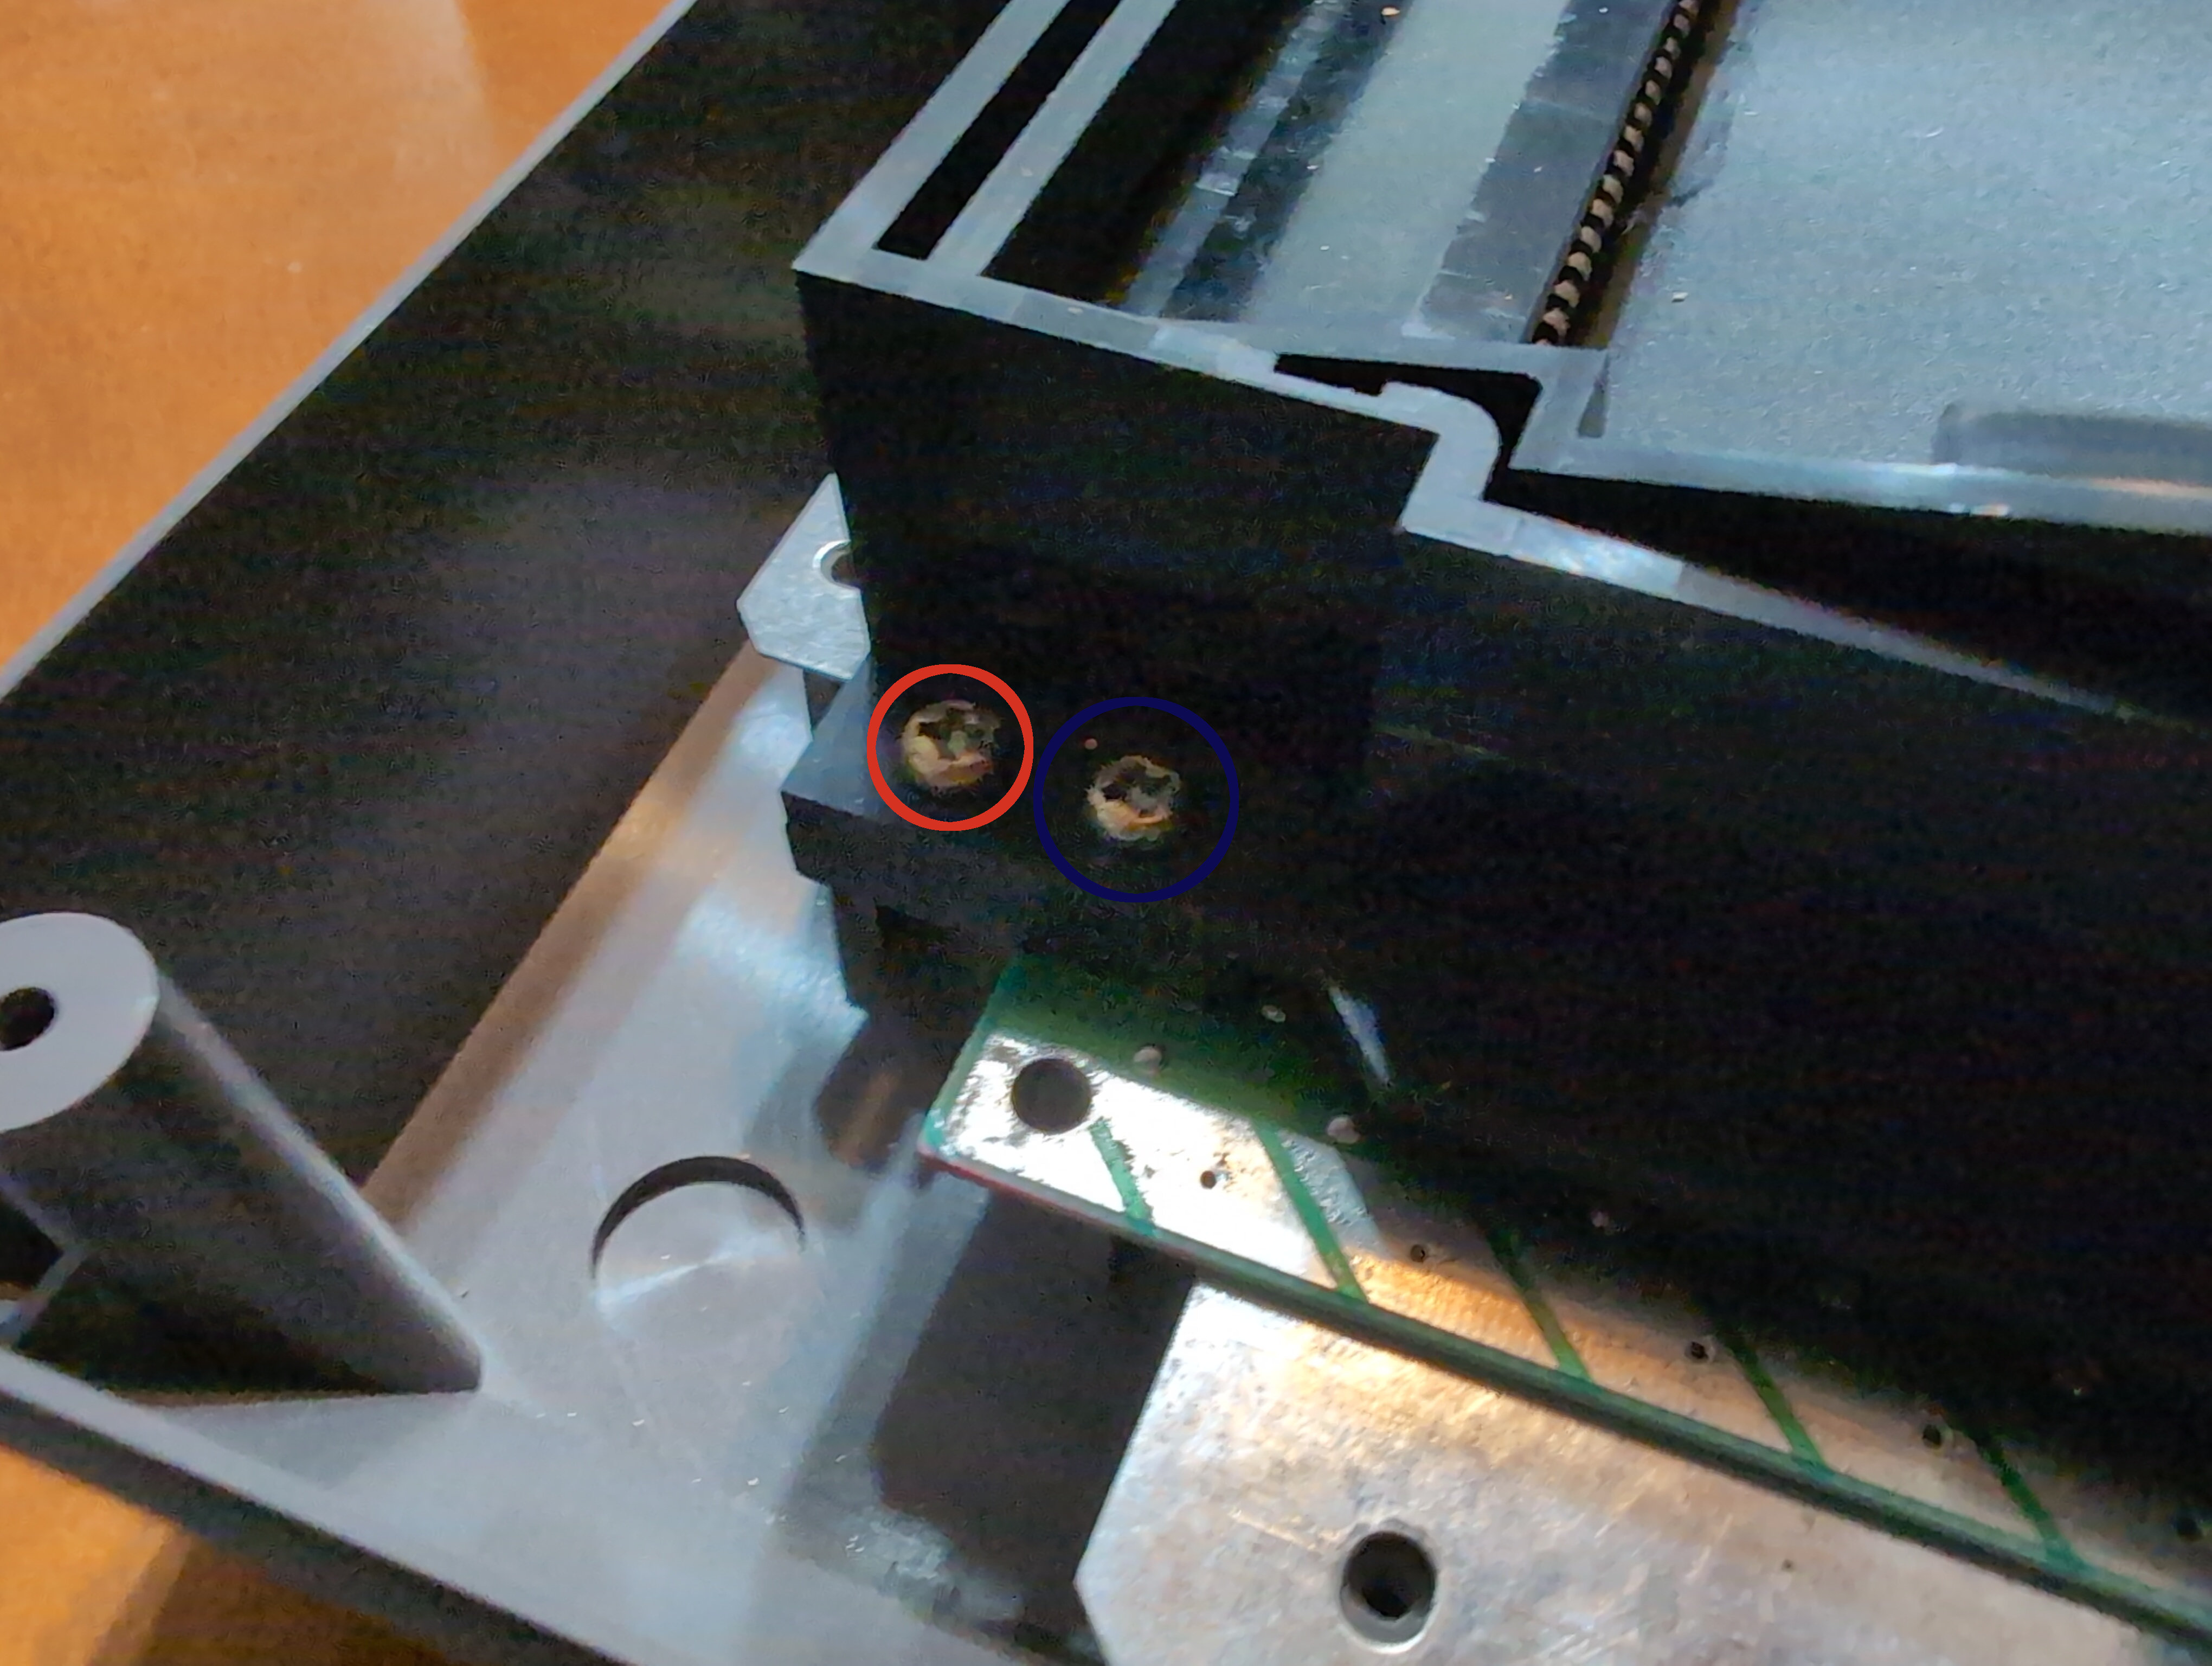
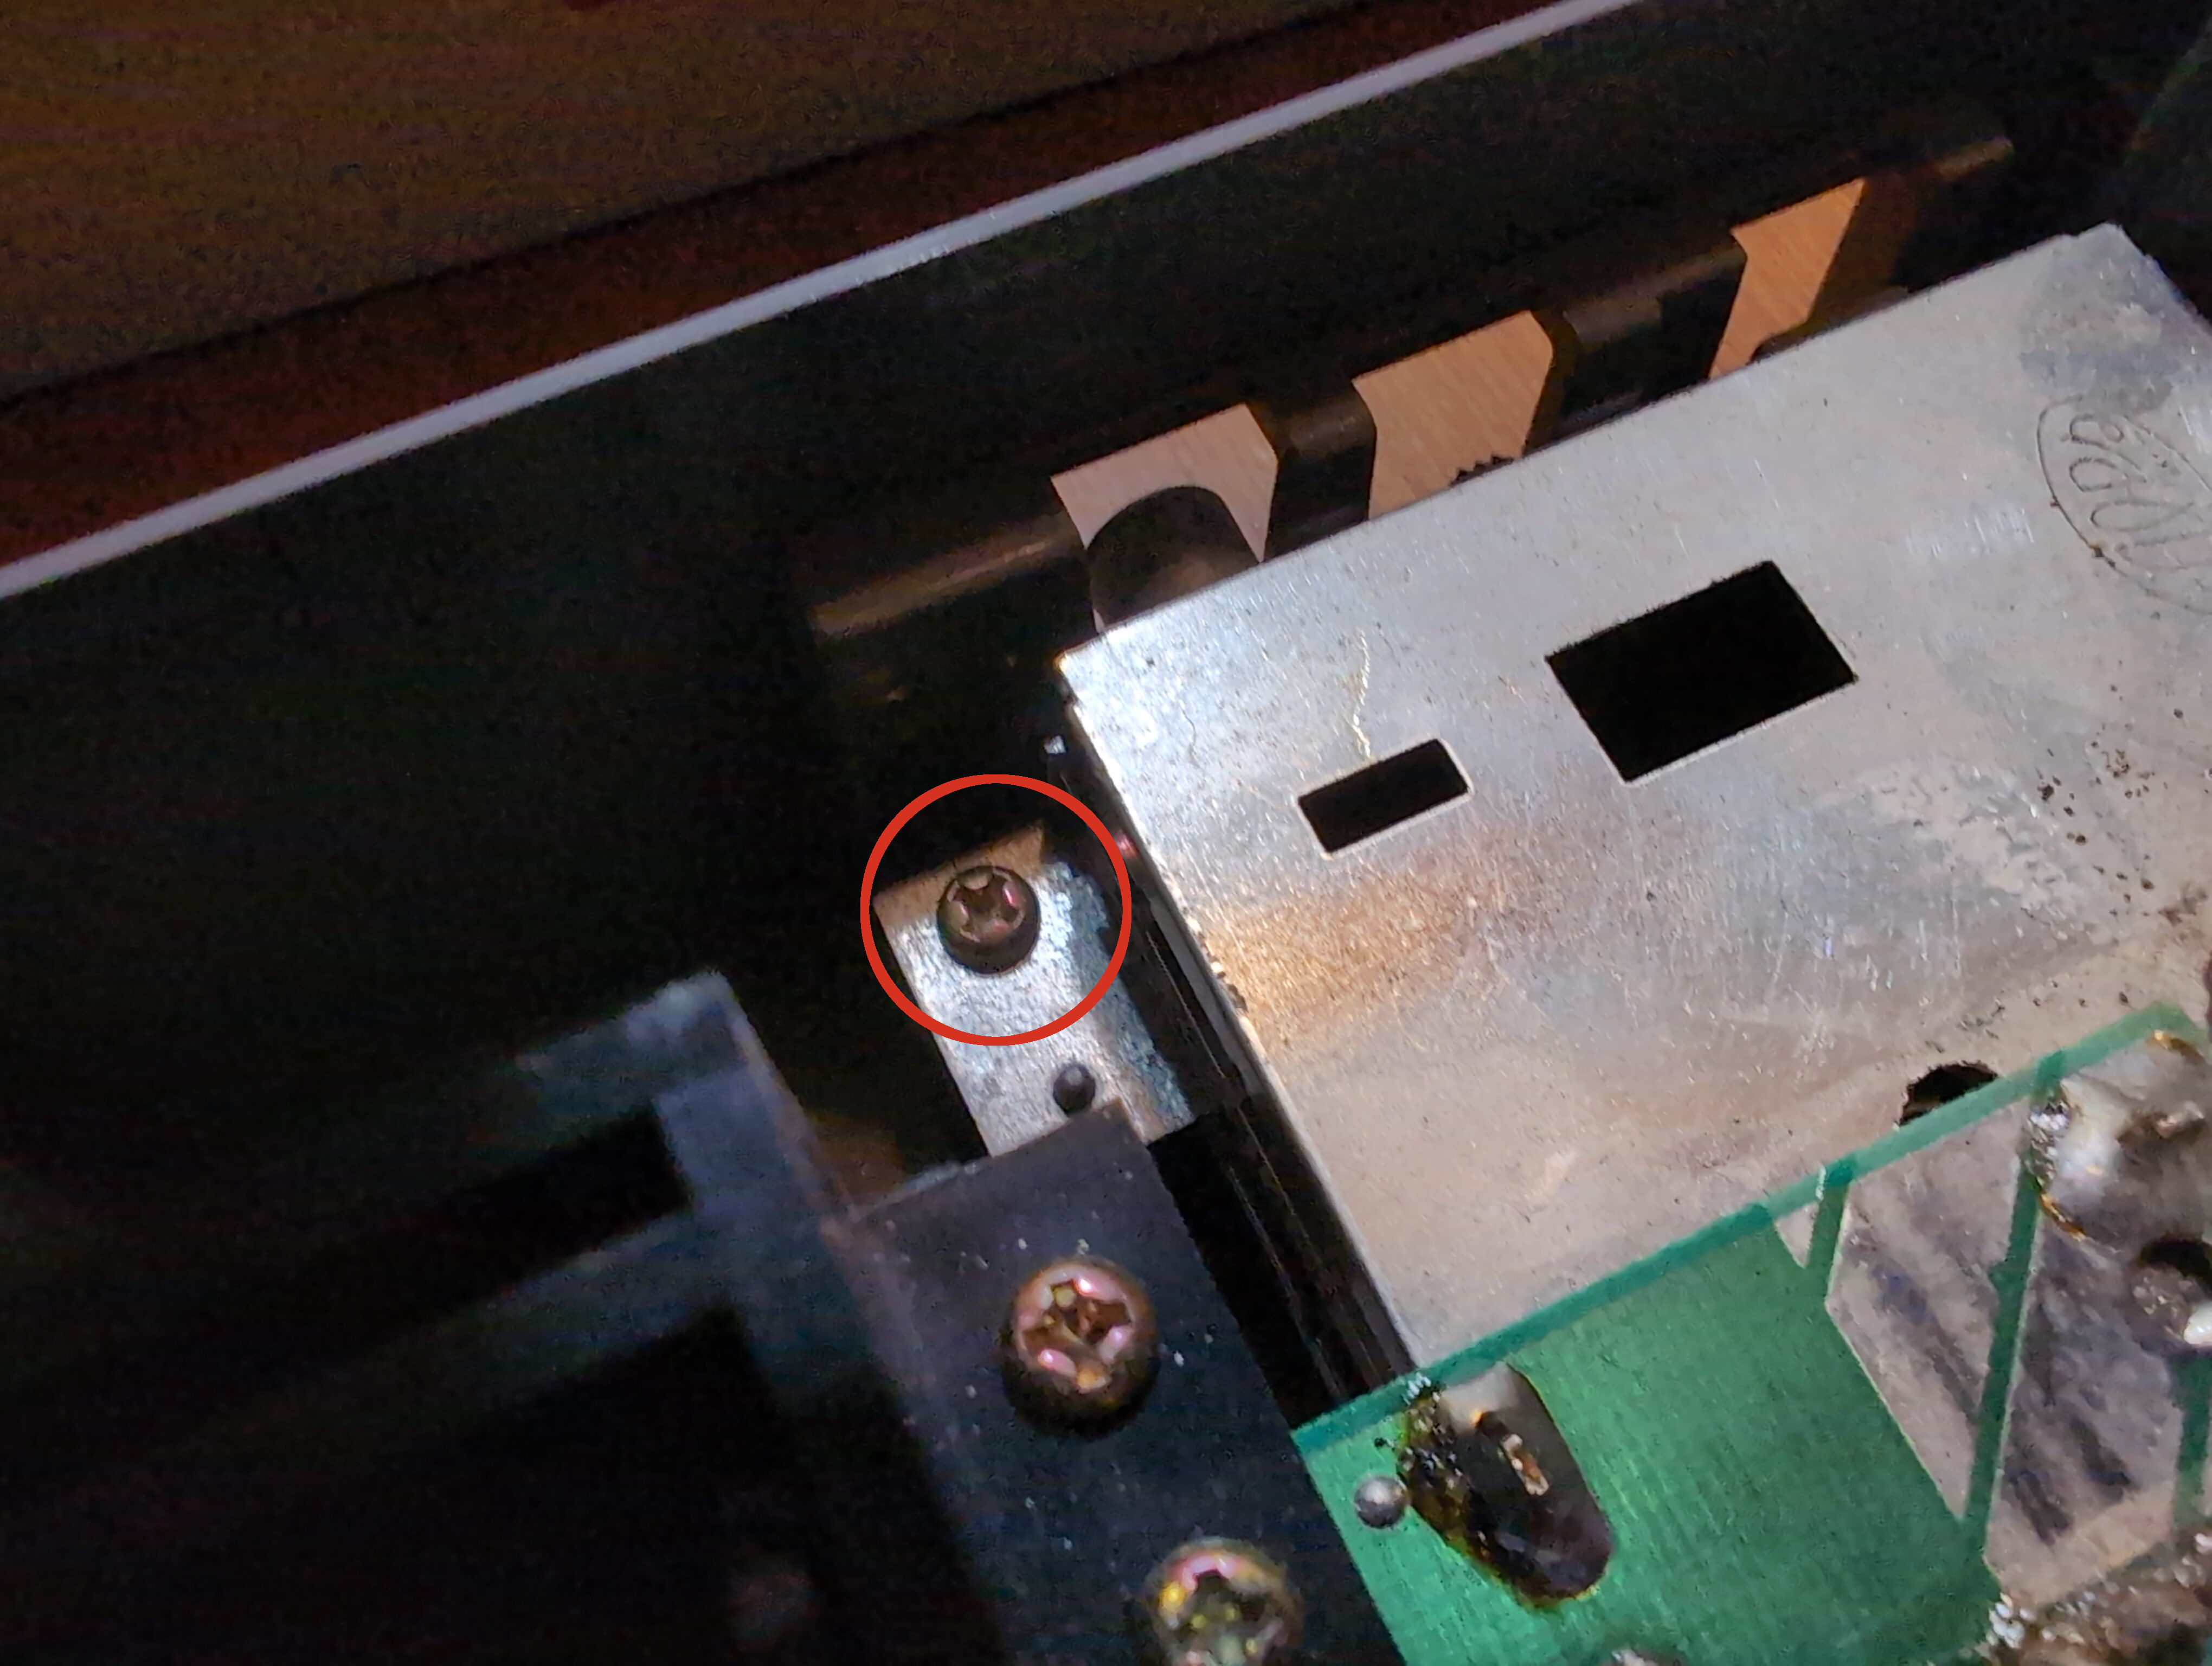
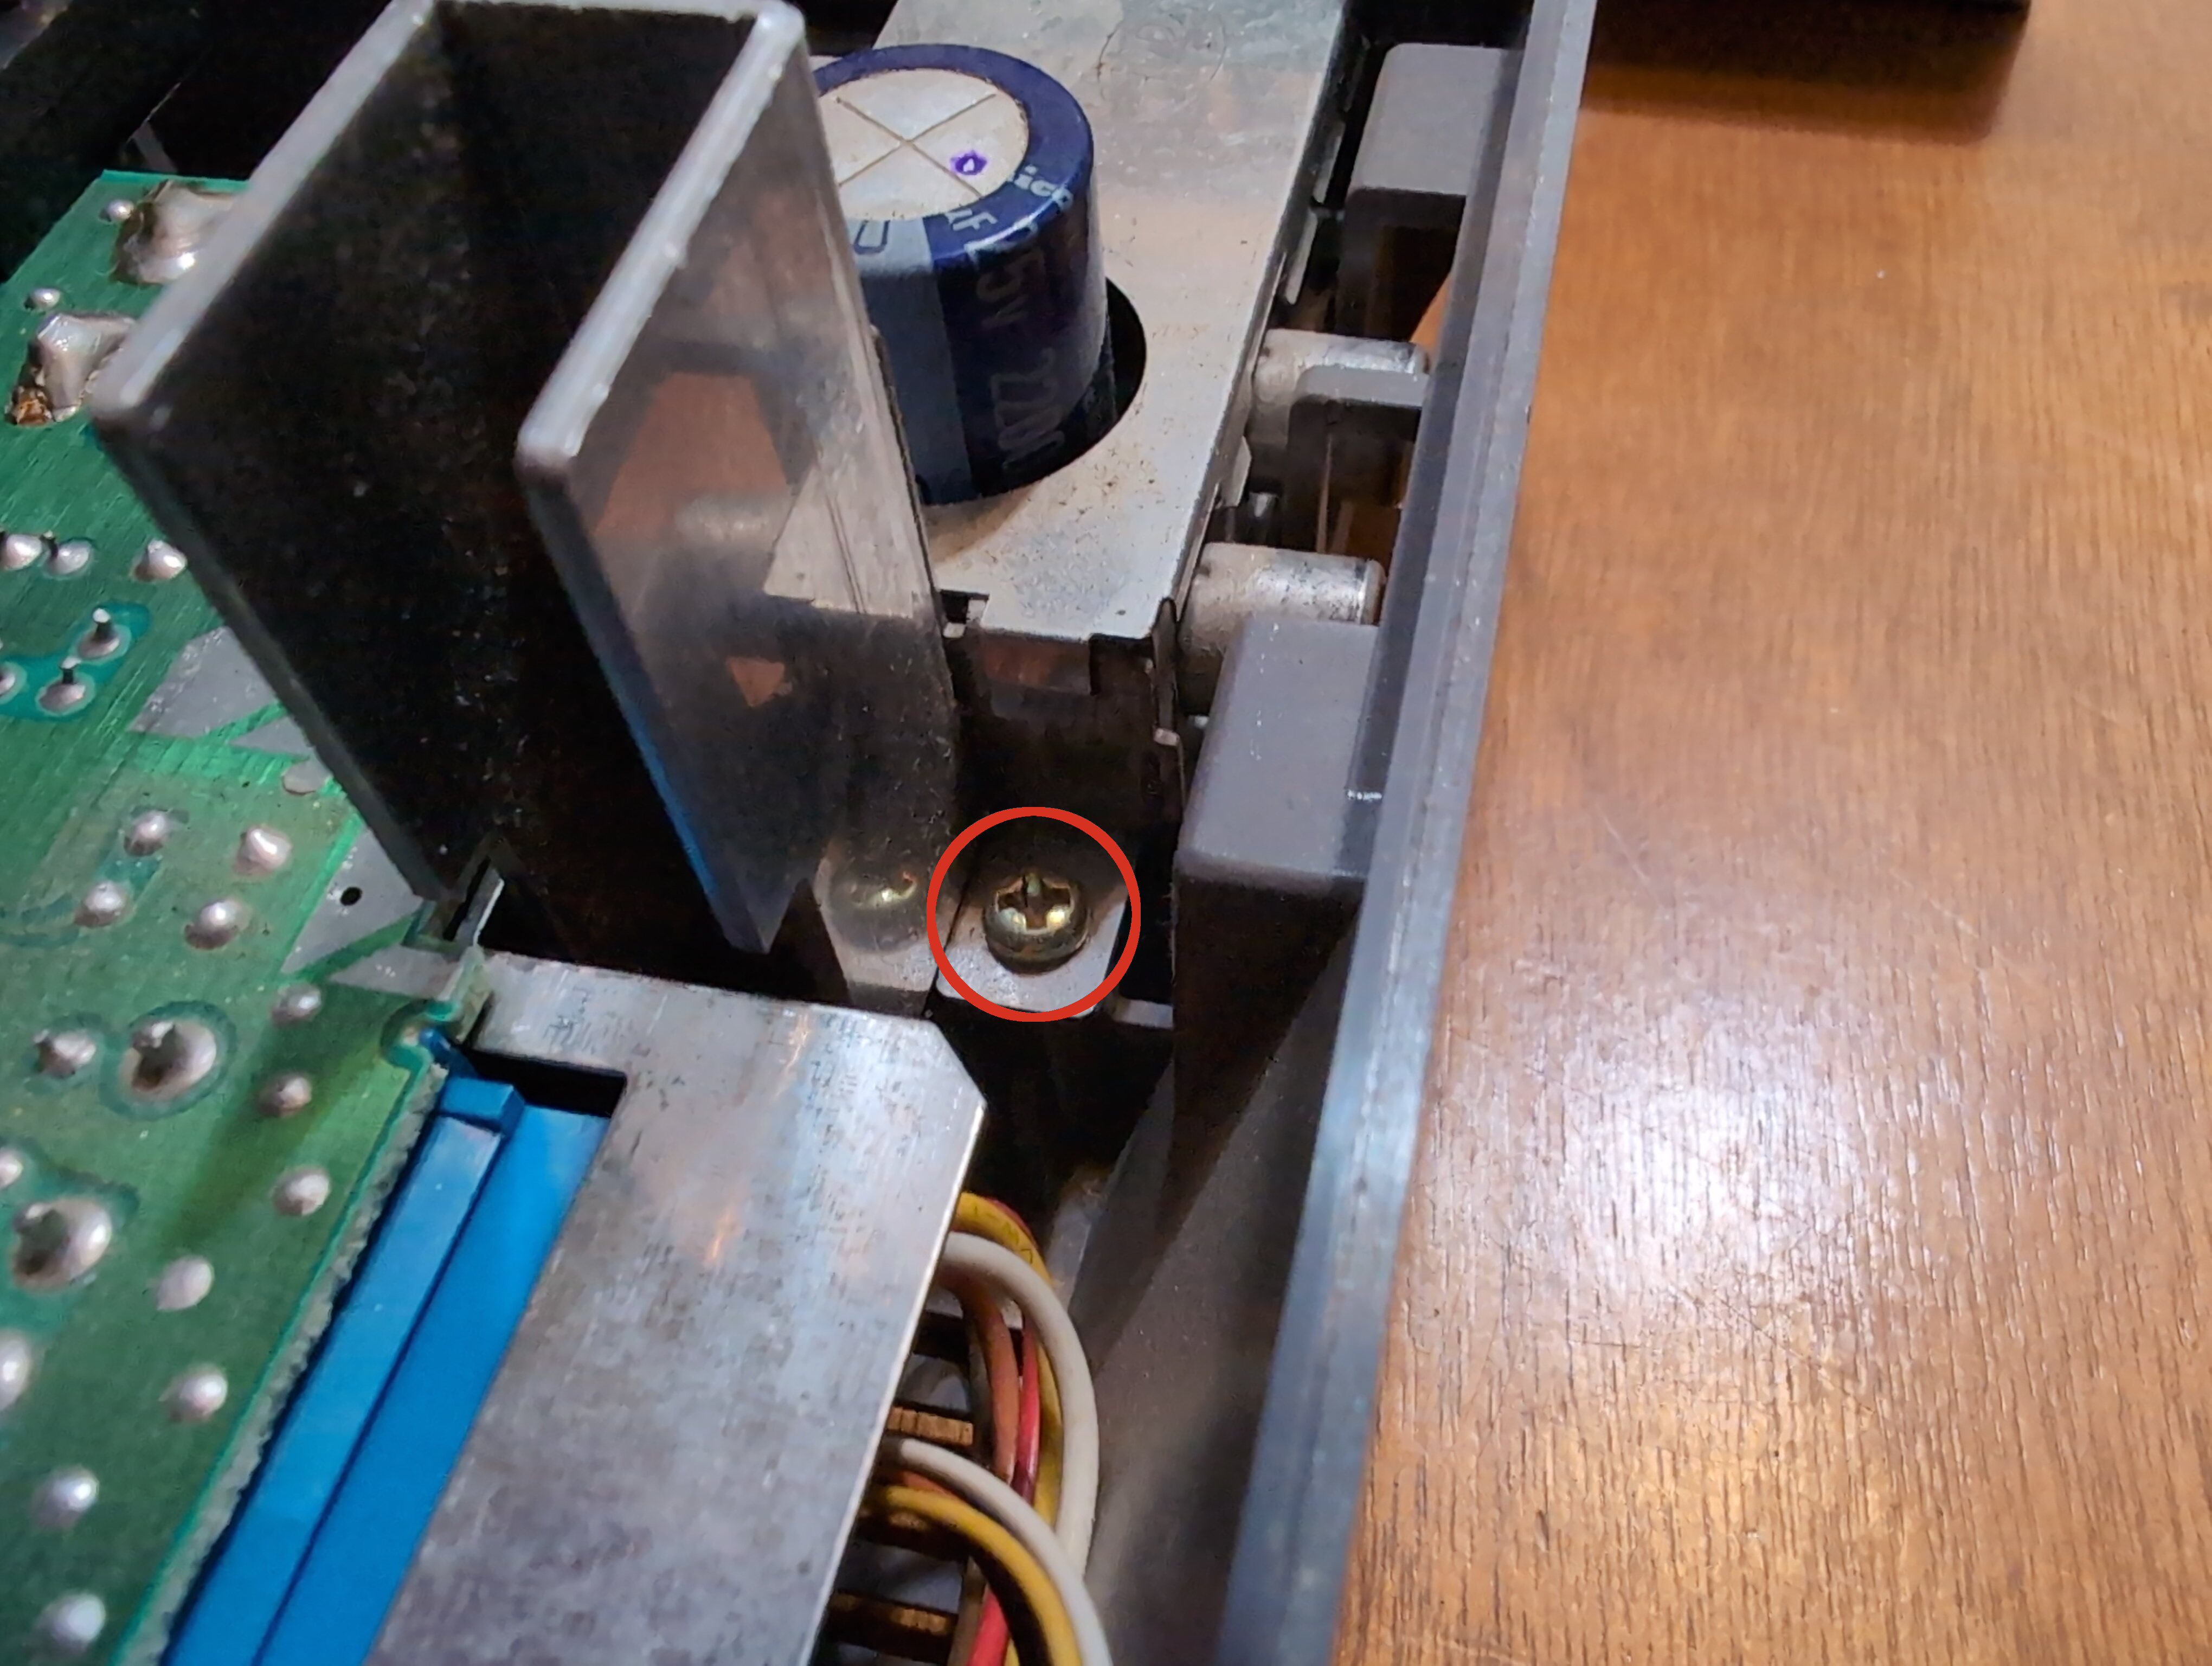
There are only two 5/8th inch screws (blue circle) and both are important to cartridge connector alignment. Do not lose them. Do not install 1/2 inch screws in their place. Do not install 5/8th inch screws in place of 1/2 inch screws.
Click images to enlarge. They'll open in a separate tab.
A) Remove the two 5/8th inch screws circled in blue fastening the cartridge connector to the tray
B) Remove the four 1/2 inch screws circled in red fastening the tray to the bottom casing.
C) Remove the two 1/2 inch anchor screws fastening the motherboard to the bottom casing. Your magnetic screwdriver will help greatly here.
Special thanks to my daughter for helping film
The cartridge tray features a tab that slots under the motherboard. Keep this in mind during reassembly. Failure to do so can damage the casing, ruin your pin connector alignment, and cause other general problems.
A) Remove the tray (it may need some wriggling) and set it aside.
B) Using your thumbs, push the 72 pin connector away from the main board. It should slide off neatly. Sometimes, this step requires some force. Try to avoid touching the contacts with your fingers.
Please inspect the connector for damaged, broken pins, and foreign materials. If there's foreign material, remove it. If you find a busted pin, it's better to replace the connector rather than trying to put it back into place. If the pins look uneven, i.e. like someone else tried to haphazardly bend them back into place, throw it out and replace it. You'll know when you see it. This is a photo of a fully functional, unmodified connector. Use it for reference. Coloration is irrelevant and shouldn't be used to judge anything.
This would also be a great time to do the Game Genie test as described above.
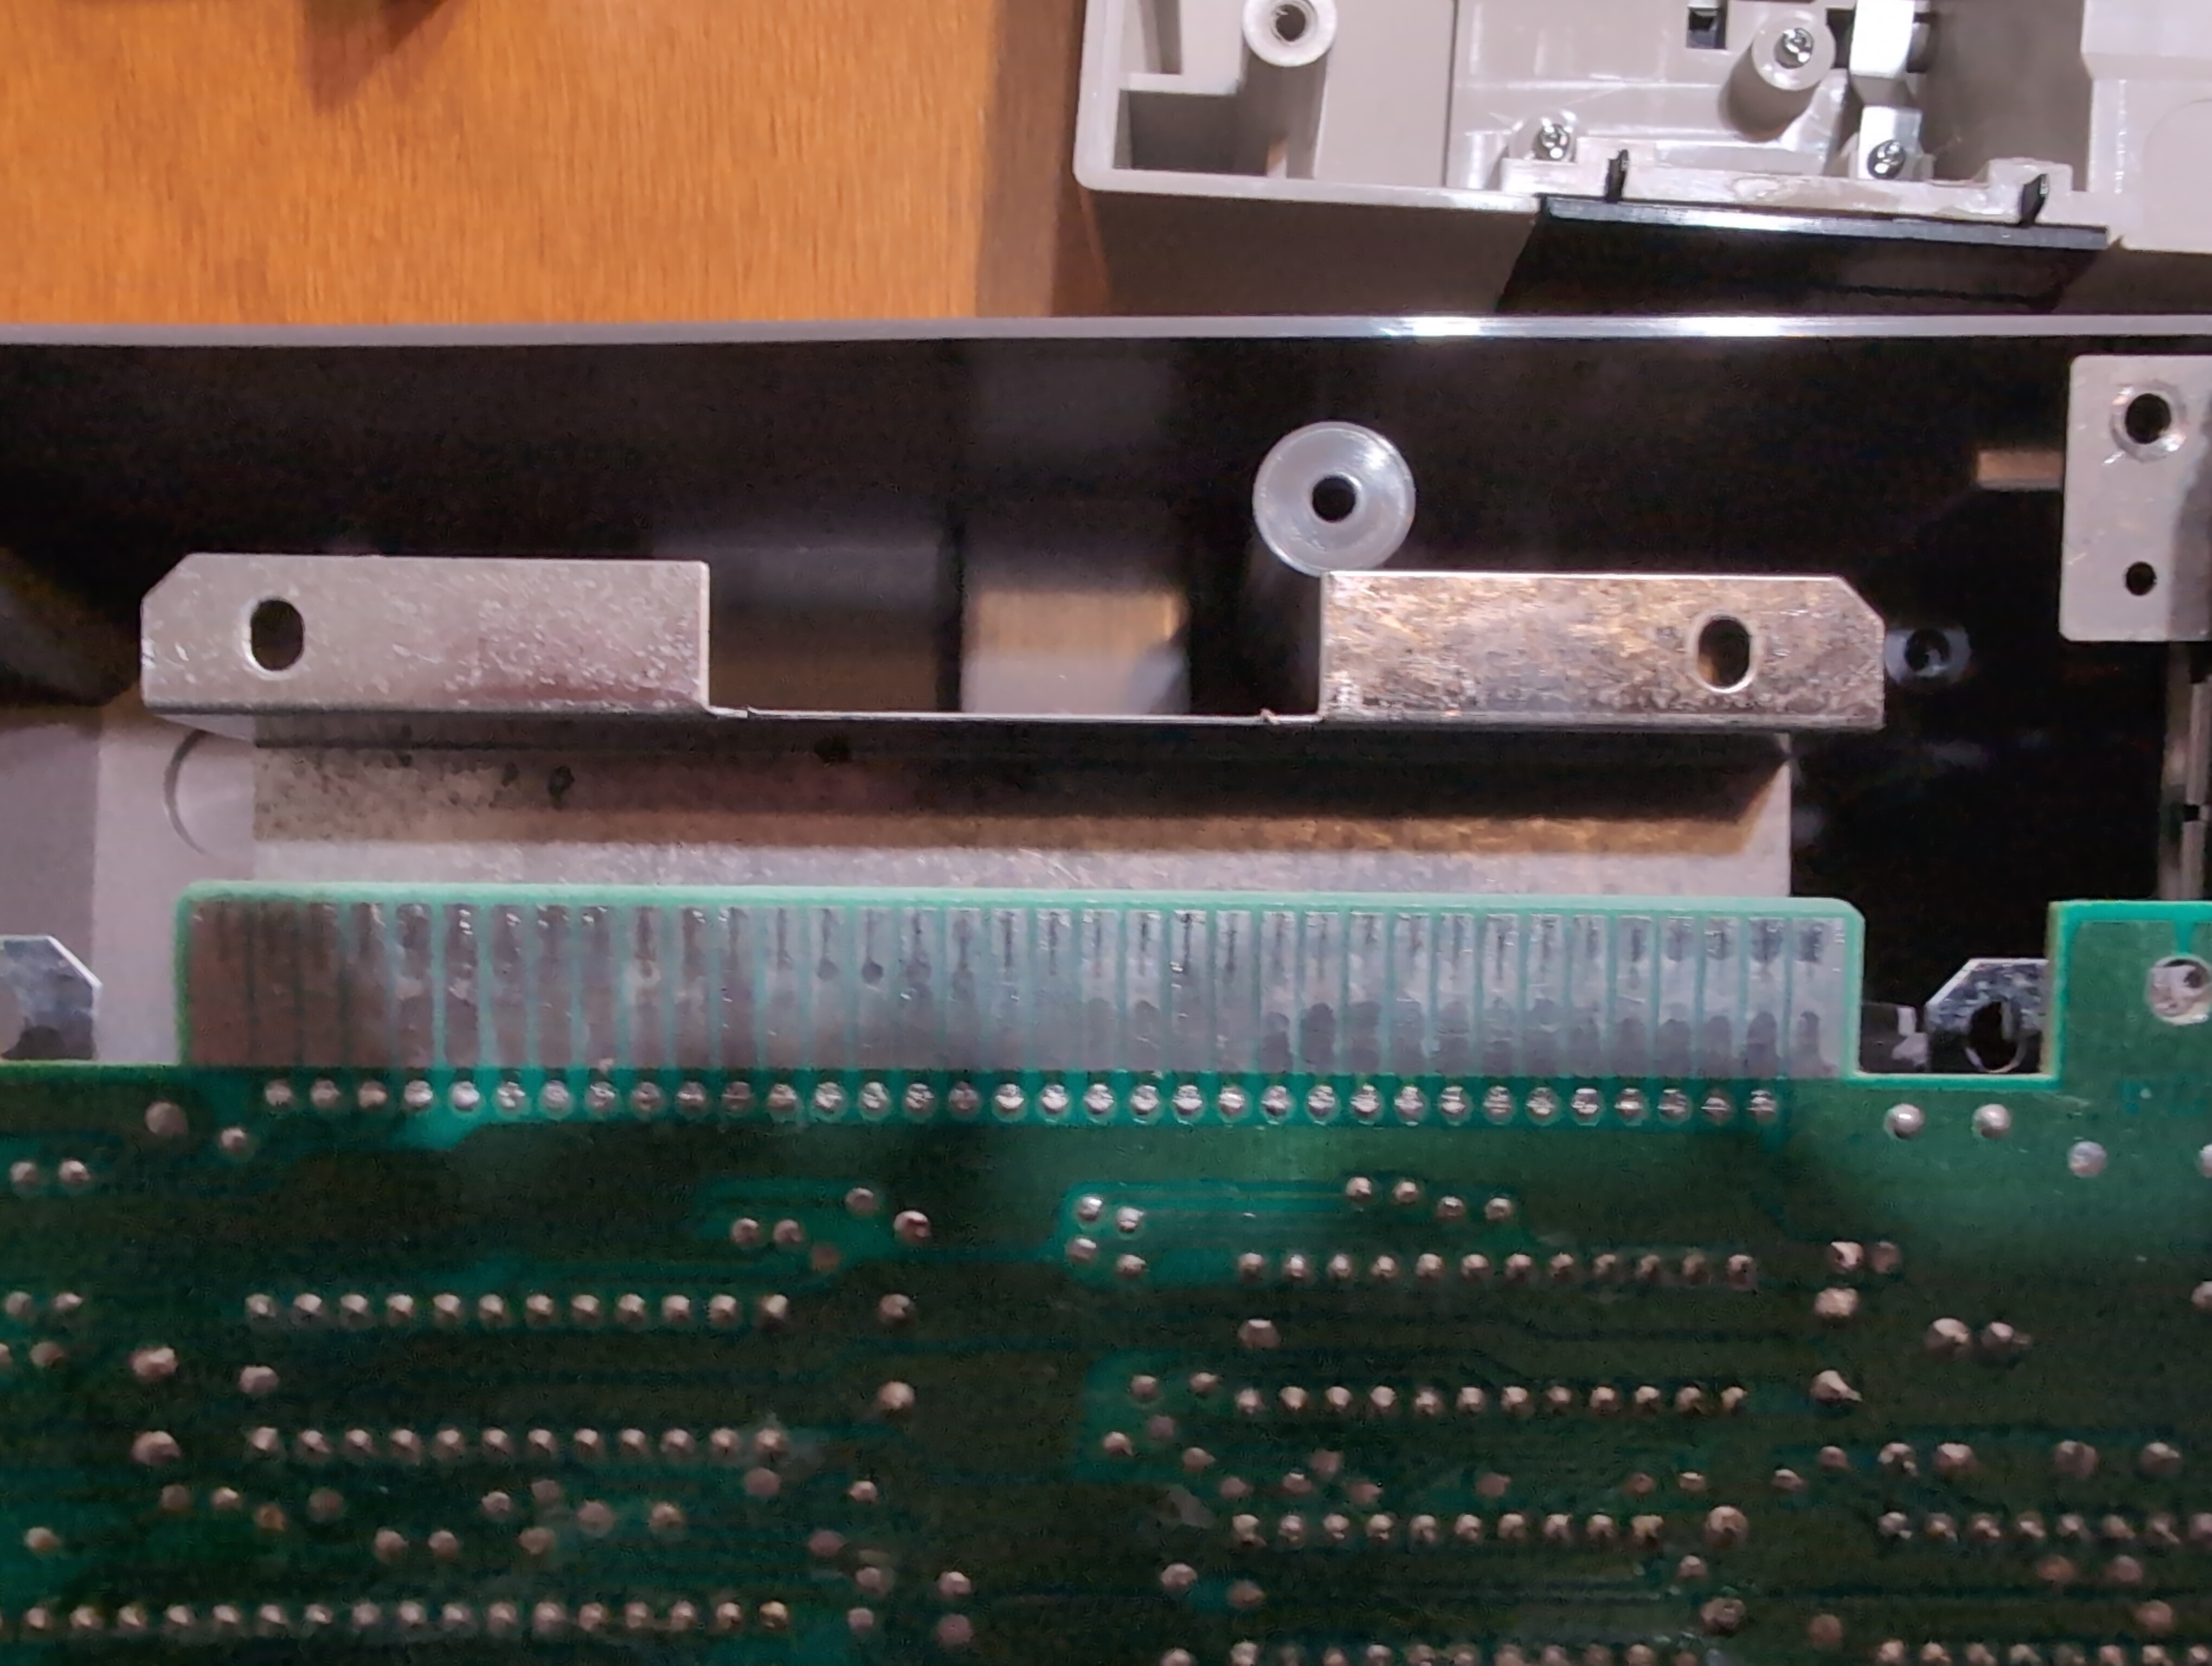
Using a Q-Tip and your 99% Isopropyl alcohol, gently wipe the motherboard's edge connector. For best results, clean each pin individually. Once your Q-tips stop turning black, you're done.
As established above by their own patent, Nintendo did not design this cartridge connector to account for contact wiping. As such, we're going to have to simulate it ourselves. This is safe for both the cartridge connector and your NES game as long as you follow these instructions.
Grab a clean game cartridge. The game MUST be clean. Use something cheap, common, and crappy. (John Elway's Quarterback, Anticipation, etc.). You're not going to damage this game, but why use something worth playing?
A) Spray the 72-pin connector liberally with your contact cleaner.
Your 72-pin connector is designed solely to accept a 1.2mm card edge. Do not insert credit card wrapped in cloth or any other foreign material. For this, I wouldn't recommend a 1UP card because I haven't tested it any scenario let alone this one.
B) Take your game, insert it into the 72-pin connector, and bend it down like the cartridge would be as held in place by the cartridge tray.
C) Pull it out.
D) Repeat steps 7A to 7C rapidly until the contact cleaner dries.
E) Clean the cartridge contacts with a Q-Tip and your contact cleaner / 99% Isopropyl Alcohol. Do not use water or any other solvent.
F) Repeat this process until your Q-tip is no longer blackened by scrubbing the pins.
A) After it fully dries, lift the motherboard up out of the casing and reattach the 72-pin connector.
B) Ensuring that no wiring is caught between the mother board and the screw anchors on the bottom right side of the console, carefully slot the motherboard back into place.
C) Ensure the mother board and bottom RF shielding are fully slotted into the casing. There are two small posts on the left and right sides of the console that should be fully routed through. Be especially cautious with the one on the right side next to the blue connector.
This section is very important. A fully functional pin connector can still fail to make a connection if it, the cartridge tray, and main board are not lined up correctly.
Only touch the cartridge tray and power button. Do not touch the NES' circuitry while the console is connected to power.
A) Reinstall the cartridge tray, making sure that the tab slides under the front of the motherboard. Do not screw anything in.
B) Insert a clean game into the cartridge tray and power on. You should see the title screen. If you don't see it, make small adjustments until you do.
C) Unplug power, drain residual energy, and gently reinstall the screws starting with the 5/8th inch ones. Use a very light touch while tightening. DO NOT REMOVE THE GAME!
D) With your cartridge tray fully installed, plug in the power and test your game once more. Remove/insert your game several times, powering on each time to ensure the game boots.
E) If everything is functional, congratulations! you've fixed your NES. Unplug the power, drain residual energy, and put everything back together.
F) The most important step of all is to have fun! Enjoy your fully functional NES!
If your game still isn't booting, remove the cartridge tray. With the cartridge tray removed, insert a game into the cartridge port. Using one finger, press the cartridge down relative to where it would be if the cartridge tray were installed and depressed. Power the console on and look for the title screen. If you still don't see it, let up very slightly on the cartridge and try again. Repeat until you see some sign of life. If you still don't see anything, repeat step 7 or refer to the boiling section below.
*This is rhetorical and having fun IS NOT the most important step. Please do not have fun with your NES until all other safety and repair precautions have been followed. -Koreijou.org Legal Team
You may have followed the above instructions to the letter and the NES still won't boot. That's okay- it's part of the process sometimes. just follow the rest of these instructions.
Boiling the 72-Pin Connector is a long standing cleaning method within the NES community and I stand by it. As long as you follow these instructions carefully, It's safe and very effective.
People used to debate about why this works. To me, it seems obvious: the heat from boiling water helps dislodge stubborn contaminants unaffected by general cleaning. Personal experience suggests this has no effect on contact force. Good or bad.
A) Unscrew the cartridge tray and 72-pin connector
B) Remove the cartridge tray as described in step 5A
C) Remove the 72-pin connector as described in step 5B
A)Fill a clean pot with distilled water, put it on your stove, and set heat to medium.
B)Once the water is at a boil, gently place your 72-pin connector into the pot using a pair of silicon tipped tongs. Don't just toss it in.
C)Let it boil for eight minutes. The heat will dislodge contaminants and make for easier cleaning.
D)While it boils, prepare a clean surface if you haven't already.
A) Turn off the stove. Using your silicon tipped tongs, remove the pin connector from the water and place it on a clean surface. Let it sit for a moment or two.
Contact cleaner is very flammable. Turn your stove off before you spray your pin connector!
While it's hot, avoid touching the metal at the back of the connector. Hold it by the plastic only.
B) Follow the cleaning procedure as described in step 7A-7F.
C) Once you've finished cleaning the connector, spray another generous amount of contact cleaner into each side of the connector. Scrub everything thoroughly with a nail brush.
D) Soak your 72-pin connector in 99% isopropyl alcohol to displace any remaining water.
E) Scrub once more with your nail brush. Shake dry occasionally.
F) Give your 72-pin connector time to fully dry.
G) Refer back to Step 8A for reinstallation and alignment instructions.
If your NES still doesn't boot after you've followed these steps, try aligning it again. Or, consider sourcing either a different OEM 72-Pin Connector or installing a Nin10-Drawer. Do not use any other aftermarket 72-pin connector. It may damage your games.
If you were experiencing graphical issues that persist after repairing/replacing your connector, you may need to replace your NES' PPU or VRAM. It's a simple process for an experienced technician. If need be, e-mail me and we can troubleshoot it. Please understand, I may not be able to get to your e-mail immediately. There's also NESdev. They'll definitely be able to help you.
Special thanks to the following for making this guide possible
Console5 for their excellent guide on this subject, as well as everything else they provide.
Anyone that wrote a similar guide between like 2005 and 2008. I cut my teeth on your work!
NintendoAge (RIP)